Air Fryer Scotch Eggs


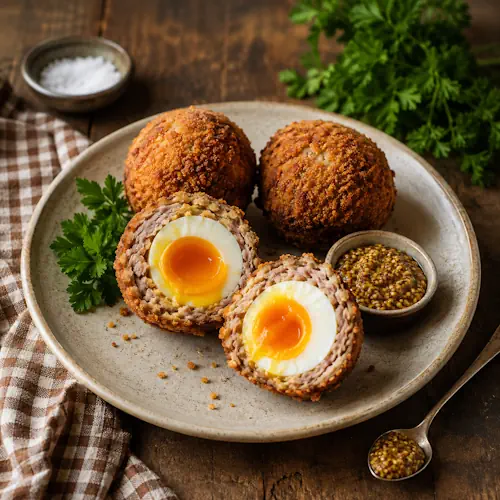
Crispy Scotch eggs with soft egg yolks and wholegrain mustard.

Air Fryer Scotch Eggs

Classic Scotch eggs made in the air fryer with boiled eggs wrapped in seasoned sausage meat and coated in crisp golden breadcrumbs. They are ideal served warm or cold with mustard.
Couverts4
Total time 40 minutes
estimated costs pp $2.25
Deel op Facebook Print Recipe

Equipment

Ingredients

Instructions

  • Preheat the air fryer to 180ยฐC.
  • Place 4 eggs in the air fryer basket and cook for 8 minutes.
  • Transfer the eggs immediately to ice-cold water. Leave to cool, then peel.
  • Combine the sausage meat, bacon, sage and mixed herbs in a large bowl.
  • Divide the sausage mixture into four portions.
  • Lay a piece of baking paper on the work surface and flatten each portion into a disc.
  • Place a peeled egg in the centre and mould the sausage mixture evenly around it to enclose completely.
  • Roll each Scotch egg in the flour.
  • Beat the remaining 2 eggs in a bowl and coat each Scotch egg in the beaten egg.
  • Press into the panko breadcrumbs until evenly coated.
  • Preheat the air fryer to 200ยฐC.
  • Lightly spray the Scotch eggs with oil, if using.
  • Air fry for 20 minutes, until golden and the sausage meat is cooked through.
  • Serve warm with mustard, if desired.

Notes & Wine Advice

Serving Suggestions

Serve the Scotch eggs warm or cold with mustard. They are also excellent with a fresh Salad or as part of a picnic or lunch platter.

Recipe Notes

Cool the boiled eggs completely before peeling and wrapping them in sausage meat. Use slightly damp hands when shaping if the sausage mixture begins to stick.
Make sure the sausage mixture completely surrounds each egg with an even layer. This helps the Scotch eggs cook evenly and prevents the egg from becoming exposed during air frying.

Cooking Advice

Lightly spraying the breadcrumb coating with oil is optional, but it helps create a more evenly golden and crisp exterior. Cook the Scotch eggs until the sausage meat is completely cooked through.

Storage Advice

Cool leftover Scotch eggs promptly and store them in an airtight container in the refrigerator. They can be eaten chilled or reheated gently in the Airfryer until thoroughly hot.

Wine Advice

A fresh white wine works well with the rich sausage, bacon and egg. Choose a suitable bottle from Renรฉ’s Wijnbeleving, particularly when serving the Scotch eggs as part of a larger lunch or picnic.

Nutrition values

Serving: 210 g | Calories: 615 kcal | koolhydraten: 38 g | Eiwitten: 32 g | Vet: 37 g | Verzadigd vet: 12 g | Natrium: 1150 mg | Suiker: 3 g
————————————————————————————————–

About Air Fryer Scotch Eggs

Air Fryer Scotch Eggs are a convenient version of the familiar British savoury snack, combining boiled eggs with seasoned sausage meat and a crisp breadcrumb coating. Instead of deep-frying, the Scotch eggs are cooked in the Airfryer, producing a golden exterior while keeping the sausage filling juicy.

Preparing the Eggs

Four eggs form the centres of the Scotch eggs. They are initially cooked for 8 minutes before being transferred immediately to ice-cold water.

Rapid cooling stops the cooking process and also makes the eggs easier to handle. Once completely cool, peel them carefully so the surface remains intact.

Making the Sausage Filling

The filling combines sausage meat with finely chopped streaky bacon, sage and dried mixed herbs. Removing the sausage skins first makes it easy to combine everything evenly.

Bacon adds additional savoury flavour and richness, while sage is particularly well suited to pork. The dried herbs provide another layer of seasoning throughout the meat.

Wrapping the Eggs

Divide the sausage mixture into four equal portions before shaping. Flatten each portion on baking paper to form a disc large enough to surround one boiled egg.

Place the egg in the centre and carefully bring the sausage meat around it. The meat should form a complete and reasonably even layer without gaps.

Creating the Crispy Coating

Each wrapped egg is first rolled in plain flour. The flour helps the beaten egg adhere to the sausage surface.

After coating with beaten egg, roll each Scotch egg thoroughly in panko breadcrumbs. Panko creates a particularly crisp, textured exterior during air frying.

Air Frying Scotch Eggs

The prepared Scotch eggs are cooked at 200ยฐC for approximately 20 minutes. A light coating of oil spray is optional but can help the breadcrumbs develop a more even golden colour.

Leave space between the Scotch eggs in the basket so hot air can circulate around each one. If the basket is small, cooking in batches is preferable to overcrowding.

Checking for Doneness

The breadcrumb coating should be crisp and golden, while the sausage meat surrounding the egg must be completely cooked through. The exact cooking time can vary slightly depending on the thickness of the sausage layer and the air fryer.

Because the eggs in the centre are already cooked, the main concern is ensuring that the pork mixture reaches the centre safely without excessively browning the breadcrumbs.

Serving Scotch Eggs

Scotch eggs can be served either warm or cold. Mustard is a traditional and particularly simple accompaniment because its sharpness cuts through the richness of the sausage, bacon and egg.

For a more substantial meal, serve them with salad, coleslaw, pickles or fresh vegetables. Their individual shape also makes them convenient for packed lunches and picnics.

A Useful Picnic Food

Once cooled, Scotch eggs are easy to transport and require no additional preparation before eating. This makes them particularly practical for picnics and informal outdoor meals.

Keep them properly chilled during transport and avoid leaving cooked Scotch eggs at warm temperatures for extended periods.

Preparing Ahead

The eggs can be boiled and cooled in advance. The sausage mixture can also be prepared separately and kept refrigerated until you are ready to assemble the Scotch eggs.

For the crispiest coating, apply the flour, beaten egg and breadcrumbs shortly before air frying.

Storage and Reheating

Allow cooked Scotch eggs to cool before refrigerating them in an airtight container. They can be served cold directly from the refrigerator or reheated in the air fryer.

Air Fryer Scotch Eggs combine a crisp panko coating, seasoned pork and bacon, and a boiled egg centre in one substantial savoury snack. Air frying removes the need for a pan of deep frying oil while still providing the characteristic crisp exterior that makes Scotch eggs so satisfying.
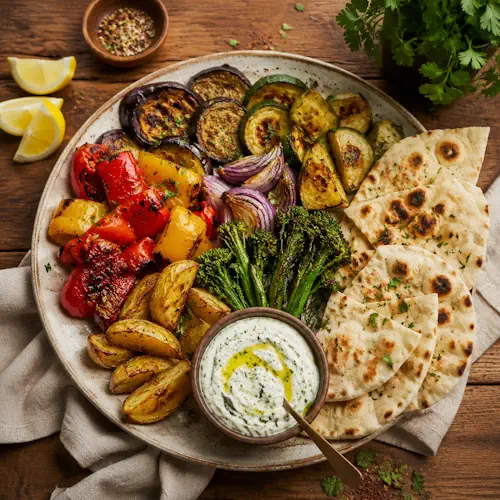

Vegetable & Flatbread Platter


Roasted vegetables, potato wedges, warm flatbreads and herbed yoghurt dip.

Vegetable & Flatbread Platter

A colourful sharing platter with crisp air-fried sugar snap peas, asparagus and baby carrots, served with toasted flatbreads and a creamy garlic, dill and wholegrain mustard yoghurt dip.
Couverts4
Total time 20 minutes
estimated costs pp $2.25
Deel op Facebook Print Recipe

Equipment

Ingredients

Instructions

  • Preheat the air fryer to 160ยฐC.
  • Combine 1 tablespoon mayonnaise with half the garlic and 1 tablespoon olive oil in a small bowl.
  • Season with sea salt flakes and freshly ground black pepper, then brush the mixture over the pitas.
  • Place the pitas in the air fryer basket and cook for 5 minutes, turning halfway through, until just golden.
  • Remove, cool and cut into 2 cm triangles.
  • Combine the remaining mayonnaise, garlic and dill with the yoghurt, mustard, capers, green onion and honey.
  • Season and transfer to a small serving bowl.
  • Preheat the air fryer to 180ยฐC.
  • Toss the sugar snap peas, asparagus, fennel wedges, radishes, baby carrots and the remaining olive oil together.
  • Air fry for 8 to 10 minutes, or until tender and lightly coloured.
  • Arrange the vegetables and toasted pita pieces on a platter.
  • Serve with the yoghurt dip and extra dill sprigs.

Notes & Wine Advice

Serving Suggestions

Arrange the warm vegetables and crisp flatbread pieces on a large platter with the yoghurt dip in the centre. This makes an easy sharing dish for lunch, a party or as an appetizer before a larger meal.

Recipe Notes

Keep the vegetable pieces reasonably similar in size so they cook evenly. The vegetables should remain slightly crisp rather than becoming completely soft.
Toast the flatbread separately from the vegetables. This allows it to become golden and crisp without absorbing moisture from the vegetables.

Cooking Advice

Do not overcrowd the air fryer basket. Cook the vegetables in batches if necessary so the circulating hot air can reach them evenly.

Storage Advice

Store leftover vegetables, flatbread and yoghurt dip separately in airtight containers in the refrigerator. Reheat the vegetables and flatbread briefly in the Airfryer and serve the dip chilled.

Wine Advice

A fresh Sauvignon Blanc pairs well with the green vegetables, dill and tangy yoghurt dip. Its freshness also works nicely with the capers and wholegrain mustard.

Nutrition values

Serving: 320 g | Calories: 425 kcal | koolhydraten: 53 g | Eiwitten: 13 g | Vet: 19 g | Verzadigd vet: 4 g | Natrium: 780 mg | Suiker: 13 g
————————————————————————————————–

About Vegetable & Flatbread Platter

Vegetable & Flatbread Platter combines colourful air-fried vegetables, crisp toasted flatbread and a creamy herb yoghurt dip in one generous sharing dish. Sugar snap peas, asparagus and baby carrots provide plenty of fresh texture, while garlic, dill, capers and wholegrain mustard give the dip a savoury and slightly tangy character.

A Platter Made for Sharing

Rather than serving the vegetables as a conventional Side Dish, everything is arranged together on a large platter. The vegetables, toasted bread and dip can then be picked and combined at the table.

This presentation makes the recipe particularly useful for informal meals and gatherings. It can be placed in the centre of the table and shared rather than portioned individually.

Preparing the Flatbread

The Greek-style pitas are brushed with a seasoned mixture before being toasted in the air fryer. Cooking them briefly at 160ยฐC gives them a golden surface while allowing them to become crisp enough for dipping.

Once cooled slightly, cut the bread into small triangles. These pieces are easy to arrange around the platter and sturdy enough to scoop up the yoghurt dip.

Making the Yoghurt Dip

Natural yoghurt provides a creamy base without making the dip excessively heavy. Mayonnaise adds richness, while garlic, dill and wholegrain mustard provide the main savoury flavours.

Finely chopped capers introduce acidity and saltiness. Their stronger flavour is distributed throughout the dip rather than dominating individual mouthfuls.

Preparing the Vegetables

The vegetables are prepared in bite-sized pieces before cooking. Woody ends are removed from the asparagus, while the remaining vegetables require only minimal preparation.

A small amount of olive oil helps the surfaces colour in the air fryer without making the vegetables greasy.

Air Frying the Vegetables

The air fryer is increased to 180ยฐC for the vegetables. They need only around 8 to 10 minutes because the aim is to soften them while preserving some bite.

Cooking at relatively high heat also creates lightly browned edges, providing a roasted flavour without the longer cooking time required in a conventional oven.

Keeping the Vegetables Crisp

Space in the air fryer basket is important. When vegetables are packed too closely together, released moisture becomes trapped and they begin to steam rather than roast.

Cook in batches when necessary. This may take slightly longer overall, but the finished texture will be considerably better.

Assembling the Platter

Place the yoghurt dip in a small bowl in the centre of a large serving platter. Arrange the warm vegetables and crisp pita triangles around it and finish with fresh dill sprigs.

Keeping the dip separate prevents the bread from becoming soggy and allows everyone to choose how much dressing they want.

Serving Ideas

This platter can be served as an Appetizer for several people or as part of a larger lunch. It also works alongside salads, grilled foods and other small sharing dishes.

For a larger gathering, increase the vegetables and add extra flatbread rather than dramatically increasing the amount of dip.

Preparing Ahead

The yoghurt dip can be prepared several hours before serving and refrigerated. This also gives the garlic, dill, mustard and capers time to flavour the yoghurt.

The vegetables and flatbread are best cooked shortly before serving. If necessary, the bread can be toasted earlier and kept at room temperature once completely cool.

Storage

Keep leftover components separate. Refrigerate the vegetables and yoghurt dip promptly, while completely cooled toasted flatbread can be stored separately to preserve its texture.

Vegetable & Flatbread Platter combines crisp bread, colourful vegetables and a creamy herb dip in a relaxed sharing dish. The different textures make it substantial enough for entertaining while the air fryer keeps preparation and cooking straightforward.

Cheese & Onion Pasties


Golden cheese and onion pasties with a creamy potato filling, caramelised onions and cheddar.

Cheese & Onion Pasties

Crisp homemade pasties filled with sweet onions, green onions, parsley, mustard and melted cheese. Air frying gives the pastry a golden finish while keeping the savoury cheese and onion filling soft and rich.
Couverts4
Total time 55 minutes
estimated costs pp $1.35
Deel op Facebook Print Recipe

Equipment

Ingredients

Pastry

Instructions

  • To make the pastry, place the flour in a bowl and grate the chilled butter directly into it.
  • Add the mustard powder and half the beaten egg.
  • Season lightly with sea salt and bring the dough together with your hands.
  • Add up to 3 tablespoons cold water if needed.
  • Briefly knead into a smooth ball, flatten into a disc, wrap and chill while preparing the filling.
  • Heat the vegetable oil in a frying pan over medium heat and cook the onions with the thyme for 4 to 10 minutes, until softened and lightly caramelised.
  • Cool, then mix with the grated cheese, wholegrain mustard and green onions.
  • Roll the pastry on a floured surface to about 3 mm thick.
  • Cut out 10 to 12 circles approximately 10 cm in diameter, re-rolling the pastry scraps as necessary.
  • Spoon filling into the centre of each circle.
  • Brush the edges with beaten egg, fold into half-moon shapes and crimp to seal.
  • Transfer to a lined tray and brush the tops with the remaining egg.
  • Preheat the air fryer to 200ยฐC.
  • Cook the pasties for 20 to 25 minutes, until deep golden.
  • Cool for at least 10 minutes before serving.

Notes & Wine Advice

Serving Suggestions

Allow the pasties to cool for at least 10 minutes before serving, as the cheese filling will be extremely hot straight from the air fryer. Serve warm for lunch or as a savoury snack with a crisp green salad.

Recipe Notes

Keep the butter well chilled when preparing the pastry. Grating it directly into the flour makes it easier to distribute without overworking the dough.
Allow the onion mixture to cool before combining it with the cheese. Adding hot onions can soften the cheese prematurely and make the filling harder to handle.

Cooking Advice

Do not overfill the pastry circles. Leave enough clean pastry around the edges to create a secure seal, then crimp firmly to prevent the melted cheese from escaping during cooking.

Storage Advice

Store cooled pasties in an airtight container in the refrigerator for up to 2 days. Reheat them in the Airfryer until thoroughly hot and the pastry is crisp again.

Wine Advice

A crisp Sauvignon Blanc provides enough freshness to balance the mature cheddar and buttery pastry. A light Pinot Noir is a good red alternative with the caramelised onion and thyme.

Nutrition values

Serving: 4 pasties | Calories: 535 kcal | koolhydraten: 41 g | Eiwitten: 17 g | Vet: 34 g | Verzadigd vet: 19 g | Natrium: 620 mg | Suiker: 5 g
————————————————————————————————–
Course; Air fryer / Cheese / Pastry / Snack
Cuisine; England / European
Season: All Seasons

About Cheese & Onion Pasties

Cheese & Onion Pasties combine crisp homemade pastry with a rich filling of mature cheddar, slowly softened onions, green onions, thyme and wholegrain mustard. Cooking the pasties in the Airfryer creates a deeply golden exterior while the cheese melts into the sweet and savoury onion filling.

A Classic Savoury Combination

Cheese and onion is a familiar combination in cooking from England. The sweetness of cooked onions balances the salty richness of mature cheddar, while mustard and thyme prevent the filling from becoming one-dimensional.

Using mature cheddar is particularly effective because its stronger flavour remains noticeable after cooking. A mild cheese can become lost against the pastry and caramelised onions.

Making the Pastry

The pastry is made from plain flour, chilled butter, egg, mustard powder and a pinch of salt. Grating cold butter directly into the flour distributes it quickly without requiring prolonged handling.

Bring the mixture together gently and add only enough cold water to form a smooth dough. Excessive liquid or kneading can make the finished pastry tougher.

Why the Pastry Needs to Chill

After mixing, flatten the dough into a disc and refrigerate it while preparing the filling. Chilling firms the butter and relaxes the dough, making it easier to roll and shape.

Keeping the pastry cool is particularly useful when working in a warm kitchen. If it becomes noticeably soft while shaping the pasties, return it briefly to the refrigerator.

Preparing the Onion Filling

The sliced onions are gently cooked with fresh thyme until softened and lightly caramelised. This develops their natural sweetness and removes the harshness associated with raw onion.

Once cooled, the onions are combined with grated mature cheddar, wholegrain mustard and sliced green onions. The green onions contribute a fresher onion flavour that contrasts with the sweeter cooked onions.

Using Mustard

Mustard appears in two forms. Mustard powder is incorporated into the pastry, while wholegrain mustard seasons the filling.

This gives the pasties a gentle mustard character throughout without overpowering the cheese. Whole mustard seeds also add small bursts of flavour and texture inside the filling.

Shaping the Pasties

Roll the chilled pastry to approximately 3 mm thick and cut it into 10 to 12 circles. Re-roll the scraps carefully to make the full quantity.

Place the filling in the centre rather than spreading it towards the edges. Brush the perimeter with beaten egg, fold the pastry over and crimp firmly to create the characteristic half-moon shape.

Air Frying the Pasties

Brushing the pastry with beaten egg encourages a glossy golden surface. Cook the pasties at 200ยฐC until the pastry is deeply coloured and completely cooked.

Depending on the capacity of the air fryer, several batches may be necessary. Avoid crowding because circulating hot air needs access to the surface of each pasty.

Serving Ideas

These savoury pasties are substantial enough for lunch when served with salad, coleslaw or vegetables. Their individual size also makes them convenient for picnics and informal gatherings.

They can be eaten warm or at room temperature, although allowing at least 10 minutes of cooling after cooking is essential because melted cheese retains heat surprisingly well.

Preparing Ahead

The pastry and filling can both be prepared in advance and refrigerated separately. Assemble the pasties when ready to cook so the filling does not have time to soften the raw pastry.

Alternatively, shape the pasties and keep them chilled for a short period before air frying. Brush with beaten egg immediately before cooking.

Storage and Reheating

Allow leftover pasties to cool before refrigerating them in an airtight container. Reheating in the air fryer is preferable to microwaving because it restores the crisp texture of the pastry.

Cheese & Onion Pasties turn simple ingredients into a satisfying savoury pastry with plenty of contrasting flavour and texture. Crisp buttery pastry surrounds melted mature cheddar, sweet onions, fresh green onions and mustard, making these compact pasties suitable for everything from lunch to a picnic or party table.

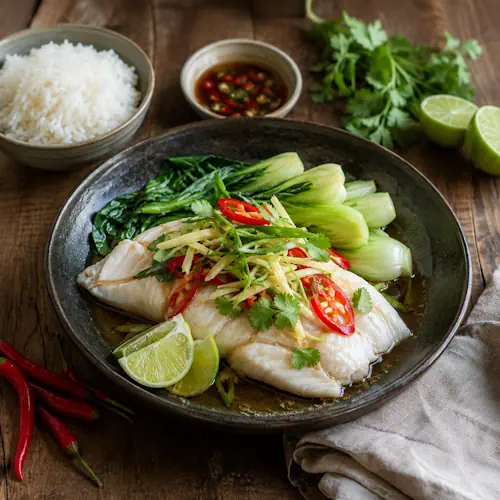
Thai Lime & Ginger Trout

Steamed white fish with pak choi, ginger, chilli, lime and jasmine rice.

Thai Lime & Ginger Trout

Tender steamed trout with pak choi, fresh ginger, garlic, red chilli and lime, finished with a savoury gluten-free soy sauce. A light Thai-inspired fish dish with fresh citrus, gentle heat and aromatic flavours.
Couverts4
Total time 20 minutes
estimated costs pp $5.25
Deel op Facebook Print Recipe

Equipment

  • chopping board,
  • foil
  • Knife
  • Steamer,

Ingredients

Instructions

  • Place the trout fillets and pak choi on two large pieces of foil.
  • Scatter the ginger, garlic and red chilli over the fish and vegetables, then add the grated lime rind and lime juice.
  • Pour over the gluten-free soy sauce and loosely seal the foil to form parcels.
  • Place the parcels in a steamer and steam for about 10 minutes, or until the trout is cooked through and flakes easily.
  • Carefully open the parcels and serve immediately.

Notes & Wine Advice

Serving Advice

Serve the trout immediately after steaming. Jasmine rice is a natural accompaniment and will absorb the fragrant lime and soy juices from the parcels. Extra steamed pak choi or mange tout can be served alongside for a larger meal.

Steaming Advice

Seal the foil loosely rather than tightly so there is space for steam to circulate around the Fish. The trout is ready when the flesh is opaque and separates easily into flakes. Avoid steaming it longer than necessary, as trout can dry out quickly.

Thai Fish Soup Variation

For the variation from the original recipe, combine 1 litre gluten-free fish stock, 1ยฝ tablespoons red Thai curry paste, 4 kaffir lime leaves and 1 tablespoon gluten-free fish sauce in a saucepan. Simmer for 5 minutes. Add 300 g skinless white fish and cook for 2 minutes, then add 150 g raw peeled king prawns, 3 quartered pak choi and a handful of coriander leaves. Simmer for another 2โ€“3 minutes until the prawns are pink and the fish is cooked through.

Storage Advice

This dish is best served immediately. If you have leftovers, cool them promptly and refrigerate in a covered container. Use within 1 day and reheat thoroughly but gently so the trout does not become dry.

Wine Advice

A Riesling is a good partner for the lime, ginger and chilli in this dish. Its fresh acidity works with the citrus while its aromatic character complements the ginger and gentle chilli heat.

Nutrition values

Serving: 300 gr | Calories: 270 kcal | koolhydraten: 10 g | Eiwitten: 35 g | Vet: 11 g | Verzadigd vet: 2 g | Natrium: 790 mg | Suiker: 4 g
————————————————————————————————–

About Thai Lime & Ginger Trout

Thai Lime & Ginger Trout brings together several flavours strongly associated with the cooking of Thailand: fresh lime, chilli, garlic, ginger and a salty fermented seasoning. Rather than relying on a rich sauce, the recipe uses these aromatic ingredients to season the trout while it gently steams.

Balance in Thai Cooking

Thai food is often characterised by the interaction of sour, salty, spicy and sometimes sweet flavours. This recipe focuses mainly on three of those elements. Lime provides acidity, soy sauce supplies saltiness and red chilli contributes heat. Ginger and garlic add fragrance and depth without requiring a long list of seasonings.

The ingredients are therefore more important as a combination than individually. The sharpness of lime prevents the fish from tasting heavy, while the savoury soy sauce provides contrast to the fresh citrus.

Fish in Thai Cuisine

Fish and seafood have an important role in Thai cooking, particularly in regions close to rivers and the coast. They appear grilled, fried, steamed and in soups and curries, often accompanied by fresh herbs, chillies and acidic ingredients.

Trout itself is not one of Thailand’s traditional native fish choices, so this recipe is best understood as a Thai-inspired preparation rather than a claim to one specific traditional Thai dish. Its character comes primarily from the flavour combination and cooking method.

The Role of Lime

Lime is particularly useful with fish because both its juice and aromatic rind can be used. In this recipe, the juice contributes acidity while the grated rind supplies citrus oils and a stronger fragrance.

This use of fresh citrus gives the dish a noticeably different character from fish seasoned primarily with dried herbs or heavy sauces. The flavour remains bright and clean, allowing the trout itself to stay prominent.

Ginger, Garlic and Chilli

Fresh ginger contributes warm, aromatic notes, while garlic provides a deeper savoury flavour. Red chilli introduces heat but is deseeded first, which makes its contribution more controlled.

Together these ingredients create an aromatic layer around the trout. Because they are enclosed with the fish, their fragrances are captured during steaming rather than disappearing into an open cooking pan.

Pak Choi

Pak choi is particularly suited to this preparation because its leafy tops and crisp stems provide two textures within the same vegetable. It softens during steaming but can retain some bite when not overcooked.

Its mild flavour also makes it a useful partner for strongly aromatic ingredients. Instead of competing with the lime, chilli and ginger, it absorbs some of the seasoned juices released inside the parcels.

Cooking with Steam

Steaming differs considerably from frying or roasting because no additional cooking fat is required. Moist heat surrounds the ingredients and gently transfers heat into the fish and vegetables.

Enclosing the ingredients in foil creates a small steaming environment of its own. Moisture released from the fish, vegetables, lime juice and soy sauce remains inside, carrying the aromatic flavours through the parcel.

A Simple Combination of Thai Flavours

The recipe demonstrates how relatively few ingredients can produce a distinctive result when each has a clear purpose. There is no elaborate curry paste or lengthy marinade. Instead, fresh aromatics and citrus provide most of the character.

That simplicity keeps the trout at the centre of the dish while still giving it a recognisably Southeast Asian flavour profile. It is a useful example of adapting familiar ingredients and a straightforward steaming technique to the bright, contrasting flavours associated with Thai cooking.

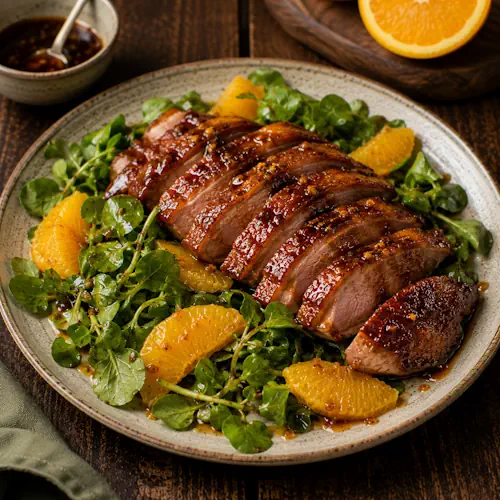
Maple-Glazed Duck with Orange


Maple-glazed sliced duck breast served with fresh watercress and orange segments on a rustic ceramic plate.

Maple-Glazed Duck with Orange

Pan-seared duck breasts glazed with maple syrup, soy sauce, ginger and orange, served with peppery watercress and a fresh citrus dressing. A rich yet vibrant main course with a sweet, savoury and tangy finish.
Couverts4
Total time 45 minutes
estimated costs pp $5.75
Deel op Facebook Print Recipe

Equipment

  • Frying Pan, Nonstick
  • Knife
  • Roasting tin
  • spoon

Ingredients

Instructions

  • Combine the soy sauce, maple syrup, honey and orange juice in a saucepan and bring to a simmer.
  • Heat a nonstick frying pan, add the ginger and simmer until the glaze thickens and becomes sticky.
  • Set the glaze aside to cool.
  • Preheat the air fryer to 180ยฐC.
  • Pat the duck skin very dry with paper towel.
  • Place the duck legs in the air fryer basket in a single layer, skin-side up.
  • Cook for 25 minutes, turning twice, until the skin begins to crisp.
  • Brush generously with the glaze and cook for a further 5 to 10 minutes, until caramelised and cooked through.
  • Transfer the duck to a warm plate and allow it to rest.
  • Make the dressing by combining the extra soy sauce, extra maple syrup, rice vinegar, sesame oil and extra virgin olive oil.
  • Divide the watercress and orange segments between four plates.
  • Top each portion with duck and drizzle with the remaining dressing.

Notes & Wine Advice

Serving Suggestions

Serve the glazed Duck on a bed of fresh watercress and orange segments, with the dressing spooned over just before serving. The combination is substantial enough for a Main Course, although roasted potatoes or steamed vegetables can be added for a larger meal.

Recipe Notes

Pat the duck skin thoroughly dry before cooking to help it become crisp. Apply the maple glaze during the final stage of cooking because its high sugar content can burn if exposed to intense heat for too long.
Allow the cooked duck to rest before serving. This gives the meat time to settle while you prepare the watercress, orange segments and dressing.

Variations

For a sharper glaze, add a little extra orange juice or rice vinegar. For additional warmth, increase the fresh ginger. The watercress can also be combined with other peppery salad leaves if desired.

Storage Advice

Store leftover cooked duck separately from the watercress and orange salad in airtight containers in the refrigerator and use within 2 days. Reheat the duck thoroughly before serving and prepare fresh watercress for the best texture.

Wine Advice

A fruity Pinot Noir pairs particularly well with rich duck, orange and the sweetness of maple syrup. A Riesling is a good white-wine alternative, with enough freshness to balance the glaze and rich duck meat.

Nutrition values

Serving: 290 gr | Calories: 485 kcal | koolhydraten: 25 g | Eiwitten: 34 g | Vet: 29 g | Verzadigd vet: 7 g | Natrium: 980 mg | Suiker: 20 g
————————————————————————————————–

About Maple-Glazed Duck with Orange

Maple-Glazed Duck with Orange combines rich Duck with a sweet and savoury glaze and a fresh watercress and orange salad. Maple syrup provides sweetness, soy sauce contributes savoury depth and fresh ginger adds warmth. The orange brings acidity and fruitiness that balances the richness of the duck.

Preparing the Maple Glaze

The glaze brings together soy sauce, maple syrup, orange and ginger. Heating these ingredients concentrates their flavours and creates a sticky consistency that can cling to the duck during the final stage of cooking.

Because maple syrup contains a considerable amount of sugar, the glaze is best applied toward the end. This allows it to caramelise without becoming excessively dark.

Preparing the Duck

Drying the surface of the duck thoroughly before cooking is important. Moisture on the skin can interfere with browning and prevent it from developing a crisp finish.

Arrange the duck in a single layer so hot air can circulate properly. Turning during cooking helps it cook evenly before the glaze is applied.

Glazing the Duck

Once the duck has begun to brown and crisp, brush it generously with the prepared maple glaze. The final cooking period allows the glaze to become glossy and caramelised.

Watch the surface carefully during these final minutes because the combination of maple syrup and orange can darken quickly.

Orange and Watercress

Watercress provides a peppery contrast to the richness of the duck. Fresh orange segments add sweetness, acidity and moisture, creating a much lighter accompaniment than a heavy sauce.

Arrange the watercress and orange immediately before serving so the leaves retain their fresh texture.

Making the Dressing

The dressing continues the flavours used in the glaze, combining soy sauce and maple syrup with rice vinegar, sesame oil and extra virgin olive oil.

Rice vinegar supplies acidity while sesame oil adds a distinctive toasted flavour. Only a small amount is needed because sesame oil can easily dominate a dressing.

Serving the Dish

Divide the watercress and orange segments among four plates before adding the rested duck. Spoon the dressing over immediately before serving.

The combination of rich poultry, fresh salad and citrus makes this suitable for both a special dinner and a festive occasion. Roasted vegetables or potatoes can be served alongside when a more substantial meal is wanted.

Sweet and Savoury Flavours

Duck naturally works well with fruit-based accompaniments. In this recipe, orange provides the familiar fruity element while maple syrup gives the glaze a deeper sweetness.

Soy sauce, ginger and sesame prevent the dish from becoming overly sweet by introducing savoury, aromatic and nutty notes.

Preparing Ahead

The glaze can be prepared in advance and refrigerated until needed. The orange can also be segmented beforehand, although the watercress is best prepared shortly before serving.

Keep the raw duck refrigerated until cooking and avoid adding the glaze too early. Once cooked, allow the meat to rest briefly before plating.

Food Safety

Keep raw duck separate from salad ingredients and other foods that will be eaten without further cooking. Wash hands, knives, boards and preparation surfaces thoroughly after handling raw poultry.

For current information about safely handling and cooking poultry, consult the U.S. Food and Drug Administration food-safety information.

Maple-Glazed Duck with Orange combines caramelised duck with citrus, peppery watercress and a savoury-sweet dressing. The contrast between rich meat, sticky glaze and fresh salad makes it an attractive Poultry dish for both everyday dinners and special occasions


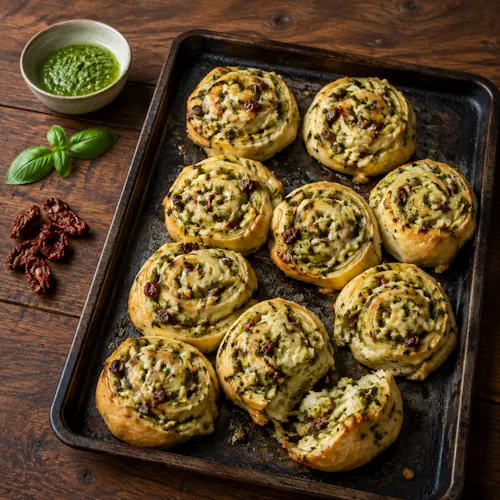
Cheese & Pesto Scrolls


Golden pesto cheese scrolls with sun-dried tomatoes and fresh basil.

Cheese & Pesto Scrolls

Soft savoury bread scrolls filled with basil pesto, sun-dried tomatoes and melted cheese. These homemade rolls are baked until golden, then brushed with milk and sprinkled with rolled oats.
Couverts4
Total time 2 hours 35 minutes
estimated costs pp $2.10
Deel op Facebook Print Recipe

Equipment

  • baking paper
  • Large bowl
  • Knife
  • Rolling Pin
  • Wire rack

Ingredients

Instructions

  • Combine the flour, yeast, sugar and salt in a large bowl.
  • Mix the honey with enough lukewarm water to make 300 ml, then gradually add it to the flour mixture with the olive oil.
  • Mix to form a dough, adding the remaining water if needed.
  • Knead for 10 minutes by hand or 5 minutes on medium speed in a mixer, until soft, springy and elastic.
  • Oil a clean bowl, add the dough, turn to coat, cover and leave in a warm place for 1 hour, until doubled in size.
  • Preheat the air fryer to 180ยฐC.
  • Line the air fryer basket with baking paper.
  • Knock back the dough and roll it on a floured surface into a 40 ร— 30 cm rectangle.
  • Spread with pesto and top with the sun-dried tomatoes, cheeses and basil.
  • Roll tightly from a long side into a log.
  • Cut into 12 even pieces.
  • Arrange the scrolls cut-side up in the air fryer basket, leaving space between them.
  • Cover and leave for 30 minutes to rise, until doubled in size.
  • Air fry at 160ยฐC for 20 to 25 minutes, until golden and the centre looks dry.
  • Leave to cool before serving.

Notes & Wine Advice

Serving Suggestions

Serve the scrolls warm or at room temperature. They are particularly good for lunch, picnics or sharing at a party and can be served alongside soup or a fresh salad.

Recipe Notes

The dough should be soft and elastic after kneading. Add the water gradually because different flours absorb slightly different amounts of liquid.
Drain the sun-dried tomatoes thoroughly before chopping them. Excess oil or liquid can make the filling too wet and prevent the centre of the scrolls from baking properly.

Cooking Advice

Leave enough space between the scrolls for them to expand during the second rise and cooking. Depending on the size of your air fryer, you may need to cook them in batches.

Storage Advice

Store completely cooled scrolls in an airtight container for up to 2 days. Reheat briefly in the Airfryer before serving if you prefer them warm.

Wine Advice

A fresh Sauvignon Blanc works well with the basil pesto and salty cheese. A light Pinot Noir is a good red alternative with the Parmesan and sun-dried tomatoes.

Nutrition values

Serving: 3 scrolls | Calories: 690 kcal | koolhydraten: 75 g | Eiwitten: 28 g | Vet: 31 g | Verzadigd vet: 12 g | Natrium: 1420 mg | Suiker: 9 g
————————————————————————————————–
Course; Air fryer / Bread / Snack
Cuisine; European / Italian
Season: All Seasons

About Cheese & Pesto Scrolls

Cheese & Pesto Scrolls combine homemade bread dough with basil pesto, sun-dried tomatoes and two cheeses. Rolled into a spiral and cooked in the air fryer, they develop a golden exterior while the centre remains soft and packed with savoury filling.

Making the Dough

The dough starts with bread flour, fast-action dried yeast, sugar and salt. Honey is dissolved in lukewarm water before being added with olive oil, creating a soft dough that can be kneaded until smooth and elastic.

The amount of water may vary slightly depending on the flour. Add it gradually rather than pouring everything in at once. The finished dough should feel soft and pliable without being excessively sticky.

Kneading and the First Rise

Kneading develops the gluten structure that allows the dough to hold the gases produced by the yeast. By hand this takes approximately 10 minutes, while a mixer can usually do the job in about 5 minutes.

Place the kneaded dough in a lightly oiled bowl, cover and leave in a warm place until doubled in size. This first rise takes approximately 1 hour.

Creating the Pesto Filling

Basil pesto provides most of the herb flavour in these scrolls. Homemade pesto works well, but a good-quality ready-made version makes the recipe considerably quicker.

Sun-dried tomatoes add concentrated tomato flavour and a pleasant balance of sweetness and acidity. Drain them thoroughly before chopping so the filling does not become excessively oily.

Using Two Cheeses

Tasty cheese provides a rich melted filling, while Parmesan contributes a stronger savoury character. Together they create both creaminess and depth of flavour.

Fresh basil leaves reinforce the flavour of the pesto and add small pockets of freshness throughout the spiral.

Shaping Cheese & Pesto Scrolls

After the first rise, knock the air from the dough and roll it into a rectangle approximately 40 ร— 30 cm. Spread the pesto evenly over the surface before adding the tomatoes, cheeses and basil.

Roll the dough tightly from one long side to create a log. Cutting it into 12 even pieces produces individual spirals with visible layers of bread and filling.

The Second Rise

Arrange the pieces cut-side up with enough room between them to expand. Cover and leave them for approximately 30 minutes, until noticeably larger.

This second rise is important because cutting and shaping compresses some of the air from the dough. Allowing the scrolls to rise again produces a softer finished texture.

Cooking in the Air Fryer

Cooking these savoury Bread scrolls in the air fryer provides strong circulating heat around the dough. Bake them at 160ยฐC for approximately 20 to 25 minutes.

The scrolls should be golden on the outside and dry rather than doughy in the centre. Because air fryers vary in size and power, check them toward the end of the cooking time.

Serving Ideas

Cheese and pesto scrolls are particularly convenient because they can be served warm or at room temperature. They work well for lunch, picnics and informal gatherings.

Serve them alongside tomato soup, a green salad or roasted vegetables. Smaller portions can also be included on a shared savoury platter.

Preparing Ahead

The scrolls can be prepared earlier in the day and allowed to cool completely before storing. A short reheating in the air fryer restores some of their freshly baked texture.

They are also practical for packed lunches because they do not require a sauce or additional filling once baked.

Storage

Allow the scrolls to cool completely before placing them in an airtight container. Trapping steam while they are still warm can make the outside soft.

Cheese & Pesto Scrolls bring together soft homemade bread, aromatic basil pesto, concentrated sun-dried tomatoes and melted cheese in an easy-to-share spiral. They are substantial enough for lunch but equally useful as a savoury snack or addition to a party table.

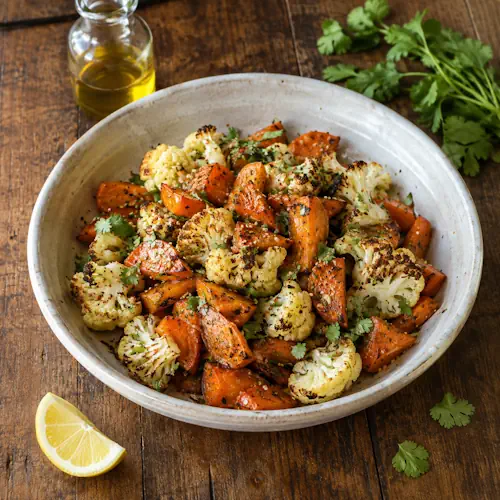
Spiced Carrot & Cauliflower Salad


Roasted carrots and charred cauliflower with cilantro, lemon and chilli flakes.

Spiced Carrot & Cauliflower Salad

Air-fried carrots and cauliflower seasoned with cumin and fennel, served with a bright coriander, lemon and honey dressing. A colourful vegetable salad with warm spices, fresh herbs and a lightly sweet citrus finish.
Couverts4
Total time 40 minutes
estimated costs pp $1.65
Deel op Facebook Print Recipe

Equipment

Ingredients

Instructions

  • Peel the garlic and place it in a blender or mini chopper with the coriander leaves, lemon juice, honey and 3 tablespoons olive oil.
  • Blend until smooth, or as smooth as possible, then season with sea salt flakes and freshly ground black pepper and set aside.
  • Preheat the air fryer to 200ยฐC for 5 minutes.
  • Place the carrots in a bowl with 2 tablespoons olive oil, honey, cumin seeds and fennel seeds and toss well.
  • Cook the carrots in the air fryer for 10 minutes, until starting to caramelise.
  • Remove the carrots and place them in a serving dish.
  • Toss the cauliflower florets and leaves with the remaining 1 tablespoon olive oil and season with sea salt flakes and freshly ground black pepper.
  • Cook the cauliflower for 15 minutes, tossing once, until tender and slightly charred.
  • Add the hot cauliflower to the carrots and leave to cool to room temperature.
  • Scatter with rocket leaves and drizzle with the coriander dressing just before serving.

Notes & Wine Advice

Serving Suggestions

Serve the salad at room temperature with the coriander dressing drizzled over just before serving. It works well as a Side Dish with grilled meat, chicken or other vegetable dishes.

Recipe Notes

Cook the carrots and cauliflower separately because they require different cooking times. The carrots benefit from starting first so they have time to soften and caramelise, while the cauliflower needs enough heat to develop lightly charred edges without becoming too soft.
Allow the cooked vegetables to cool to room temperature before adding the rocket and dressing. This keeps the leaves fresh and prevents them from wilting excessively.

Variations

Add extra chilli flakes if you prefer more heat, or increase the lemon juice for a sharper dressing. The coriander dressing can be prepared ahead and refrigerated until needed.

Storage Advice

Store the cooked carrots and cauliflower separately from the rocket and dressing in airtight containers in the refrigerator for up to 2 days. Bring the vegetables back to room temperature before assembling the salad.

Wine Advice

A fresh Sauvignon Blanc works well with the coriander, lemon and warm spices. A dry Riesling is another good choice with the honey, cumin and naturally sweet carrots.

Nutrition values

Serving: 410 g | Calories: 330 kcal | koolhydraten: 39 g | Eiwitten: 8 g | Vet: 18 g | Verzadigd vet: 3 g | Natrium: 230 mg | Suiker: 19 g
————————————————————————————————–

About Spiced Carrot & Cauliflower Salad

Spiced Carrot & Cauliflower Salad combines caramelised carrots and lightly charred cauliflower with cumin, fennel and a fresh coriander dressing. Cooking the vegetables in the Airfryer concentrates their flavour while keeping enough texture for the finished salad.

Preparing the Carrots

The carrots are cut into chunky 3 cm pieces rather than thin slices. This allows the outside to caramelise while the centres remain tender and substantial enough for a warm vegetable salad.

Tossing them with olive oil, honey, cumin and fennel before cooking creates a fragrant coating. The honey encourages browning and also complements the natural sweetness of the carrots.

Using Cumin and Fennel

Cumin seeds provide an earthy warmth, while fennel seeds contribute a sweeter aromatic character. Using whole seeds rather than ground spices also gives the finished vegetables additional texture.

The spices become more aromatic as they heat in the air fryer and cling to the lightly oiled vegetables.

Cooking the Cauliflower

The cauliflower is cooked separately from the carrots because its texture and cooking time are different. Cutting it into small florets exposes plenty of surface area to the circulating hot air.

After approximately 15 minutes, the cauliflower should be tender with lightly browned or charred edges. Tossing it once during cooking encourages more even colouring.

Using the Cauliflower Leaves

Tender cauliflower leaves do not need to be discarded. They can be cooked alongside the florets, where their edges become slightly crisp while the thicker sections soften.

Using the leaves also adds another texture to the salad and makes use of more of the vegetable.

Making the Coriander Dressing

The dressing combines fresh coriander leaves with garlic, lemon juice, honey and olive oil. Blending creates a vibrant dressing that contrasts with the warm roasted flavours of the vegetables.

The mixture does not need to become completely smooth. A slightly textured dressing works particularly well with chunky carrots and cauliflower.

Cooling Before Assembly

This salad is designed to be served at room temperature rather than piping hot. Allowing the cooked vegetables to cool slightly also gives their flavours time to settle.

Add the rocket only after cooling. Delicate salad leaves wilt quickly against very hot vegetables, while room-temperature carrots and cauliflower preserve more of their fresh texture.

Balancing Sweetness and Acidity

Honey appears both with the carrots and in the dressing, but lemon prevents the dish from becoming overly sweet. The combination creates a useful contrast with the earthy cumin and aromatic fennel.

Taste the dressing before serving and adjust the seasoning with sea salt flakes, freshly ground black pepper or additional lemon juice if required.

Serving Ideas

This colourful Salad can accompany grilled chicken, lamb, beef or other vegetable dishes. It is substantial enough to form a significant part of a shared meal rather than simply providing a few salad leaves on the side.

Because it is served at room temperature, it is also convenient for a barbecue, picnic or buffet where dishes may remain on the table for a little while before serving.

Preparing Ahead

The carrots and cauliflower can be cooked earlier in the day and allowed to cool. Prepare the coriander dressing separately and keep it refrigerated until shortly before serving.

Combine the vegetables with the rocket and dressing at the last moment. This preserves the contrast between the roasted vegetables, fresh leaves and bright herb dressing.

Storing Leftovers

For the best texture, store any remaining vegetables separately from the dressing and rocket. Refrigerate promptly in covered containers.

The vegetables can be served chilled or allowed to return to room temperature. There is no need to reheat them unless you specifically prefer the salad warm.

Spiced Carrot & Cauliflower Salad brings together sweet roasted carrots, charred cauliflower, aromatic spices and a fresh lemon-coriander dressing. Its combination of warm spices and fresh ingredients makes it a versatile vegetable dish for both everyday meals and shared tables.

Air Fryer Soda Bread Rolls


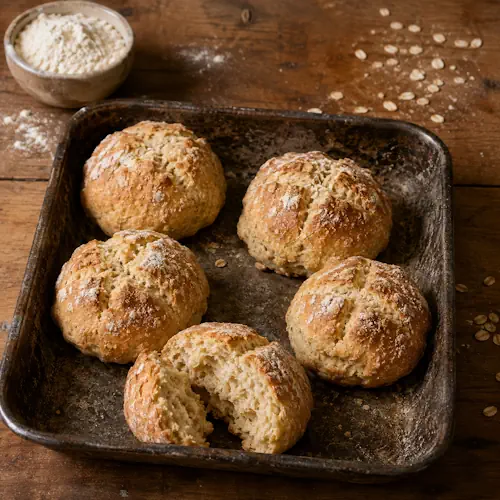
Golden homemade soda bread rolls with oats and a soft, rustic crumb.

Air Fryer Soda Bread Rolls

Quick homemade soda bread rolls made without yeast, combining plain and wholemeal flour with buttermilk or yoghurt and a touch of honey. Rolled oats add texture to the golden crust while the centres remain soft and tender.
Couverts4
Total time 25 minutes
estimated costs pp $0.55
Deel op Facebook Print Recipe

Equipment

Instructions

  • Mix both flours, bicarbonate of soda and sea salt in a bowl using a fork.
  • Pour in the buttermilk or yoghurt and honey.
  • Use a butter knife to mix until the mixture comes together as a soft dough. The dough should be slightly sticky but not wet.
  • Add a little extra flour if needed.
  • Lightly flour your hands and divide the dough into six even pieces, about 80 g each.
  • Shape into rough rounds and flatten slightly.
  • Cut a deep cross into the top of each roll, brush with milk and sprinkle with rolled oats.
  • Preheat the air fryer to 180ยฐC.
  • Line the basket with baking paper trimmed to fit.
  • Air fry the rolls in batches for 12 to 15 minutes, until golden and firm to the touch.
  • Transfer to a wire rack to cool.
  • Serve immediately or store in an airtight container for up to 2 days.
  • Warm in the air fryer at 180ยฐC for 2 to 3 minutes before serving.

Notes & Wine Advice

Serving Suggestions

Serve the soda bread rolls warm with butter, cheese, soup or alongside a main meal. They also work well for Breakfast with jam or honey.

Recipe Notes

Keep the dough slightly sticky and avoid adding more flour than necessary. Too much flour can produce dense rolls. Mix only until the ingredients come together and handle the dough gently when shaping.
The recipe makes six rolls of approximately 80 g each. Cutting a deep cross into each roll helps them cook evenly and gives them their traditional soda bread appearance.

Cooking Advice

Cook the rolls in batches if they cannot fit comfortably in the air fryer basket. Leave enough space between them for the hot air to circulate. They are ready when golden and firm to the touch.

Storage Advice

Store the cooled rolls in an airtight container for up to 2 days. Reheat them in the Airfryer at 180ยฐC for 2 to 3 minutes before serving.

Wine Advice

Wine is not normally needed with these simple soda bread rolls. When they are served alongside cheese or a savoury meal, choose a suitable wine from Renรฉ’s Wijnbeleving to match the accompanying dish.

Nutrition values

Serving: 120 g | Calories: 265 kcal | koolhydraten: 50 g | Eiwitten: 9 g | Vet: 3 g | Verzadigd vet: 1 g | Natrium: 390 mg | Suiker: 4 g
————————————————————————————————–

About Air Fryer Soda Bread Rolls

Air Fryer Soda Bread Rolls are small individual versions of traditional soda bread, prepared without yeast and cooked quickly in the Airfryer. Plain and wholemeal flour provide the base, while bicarbonate of soda supplies the raising power. Buttermilk or natural yoghurt provides the acidity needed to activate the bicarbonate of soda.

Why Soda Bread Does Not Need Yeast

Unlike conventional bread, soda bread relies on a chemical reaction rather than yeast fermentation. Bicarbonate of soda reacts with the acidity in buttermilk or yoghurt and releases carbon dioxide into the dough.

This means there is no lengthy proving period. Once the dough is mixed and shaped, the rolls can go almost immediately into the air fryer.

Using Two Types of Flour

Plain flour keeps the rolls relatively light, while wholemeal flour contributes additional flavour and a slightly more substantial texture. Combining the two provides a useful balance between softness and the rustic character associated with soda bread.

A little extra plain flour is useful for dusting your hands and work surface, but avoid incorporating too much additional flour into the dough.

Buttermilk or Natural Yoghurt

The recipe allows either buttermilk or natural yoghurt. Both provide the acidity required for the bicarbonate of soda to work effectively.

They also contribute moisture and a gentle tang to the finished rolls. The dough should be soft and slightly sticky rather than dry or stiff.

Adding Honey

Only a teaspoon of honey is used, so these remain savoury bread rolls rather than sweet ones. The honey provides a subtle sweetness that balances the tanginess of the cultured dairy ingredients.

It also contributes gently to the colour and flavour of the finished crust.

Handling the Dough

Soda bread benefits from minimal handling. Mix the ingredients only until they form a soft dough, then divide it into six approximately equal pieces.

Lightly flour your hands rather than repeatedly adding flour to the dough. Shape each portion into a rough round and flatten it slightly.

The Traditional Cross

A deep cross is cut into the top of each roll before cooking. Apart from giving the rolls their familiar appearance, the cuts allow the centre to expand more easily during cooking.

A light brushing of milk and scattering of rolled oats gives the surface additional texture and helps create an attractive golden finish.

Cooking in the Air Fryer

Preheat the air fryer to 180ยฐC and line the basket with baking paper trimmed to fit. Arrange the rolls with enough space around them for the circulating air to reach their sides.

Depending on the size of the air fryer, cooking in batches may be necessary. Each batch requires approximately 12 to 15 minutes.

Checking the Rolls

The finished rolls should be golden and feel firm when gently pressed. Transfer them to a wire rack after cooking so air can circulate underneath while they cool.

Avoid leaving freshly cooked rolls sitting on a solid surface because trapped steam can soften the bottom crust.

Serving Ideas

These rolls are versatile enough to accompany soups, salads and savoury main dishes. They can also be served warm with butter or used as a simple alternative to conventional Bread.

For breakfast, split a warm roll and serve it with butter, jam or honey. Their compact size also makes them convenient for serving individually at the table.

Storing and Reheating

Soda bread is generally at its best on the day it is baked because it does not contain yeast or preservatives that help commercial breads remain soft for longer periods.

The rolls can nevertheless be stored in an airtight container for up to 2 days. A short reheating at 180ยฐC in the air fryer restores warmth and improves the texture of the crust.

Air Fryer Soda Bread Rolls provide a fast route to freshly baked bread without kneading, yeast or proving. The combination of plain and wholemeal flour, tangy buttermilk and rolled oats produces rustic individual rolls that can move easily from breakfast to the dinner table.

Crispy Air Fryer Potato Wedges


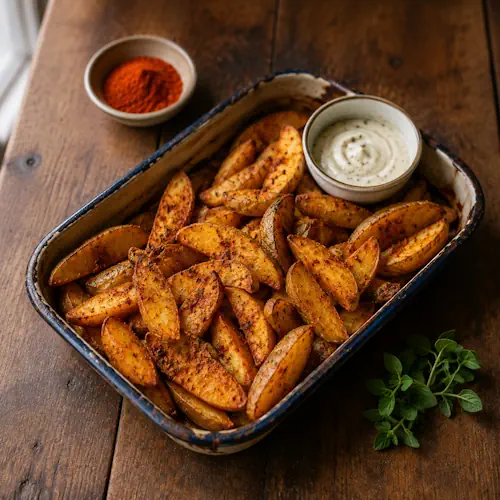
Crispy smoked-paprika potato wedges with creamy dipping sauce.

Crispy Air Fryer Potato Wedges

Crispy air fryer potato wedges seasoned with smoked paprika, oregano and onion powder. Soaking the potatoes before cooking helps create fluffy centres and crisp golden edges.
Couverts4
Total time 1 hour 35 minutes
estimated costs pp $0.65
Deel op Facebook Print Recipe

Equipment

Ingredients

Instructions

  • Place the potato wedges in a large heatproof bowl and cover with cold water.
  • Soak for 30 minutes, drain, cover with boiling water and soak for a further 15 minutes.
  • Drain well and pat the wedges completely dry with a clean tea towel.
  • Toss the wedges with the oil, smoked paprika, oregano and onion powder.
  • Season with sea salt flakes and freshly ground black pepper.
  • Preheat the air fryer to 200ยฐC.
  • Cook the wedges for 30 to 40 minutes, shaking every 10 minutes, until golden and crisp.
  • Serve immediately with your choice of sauce or dips.

Notes & Wine Advice

Serving Suggestions

Serve the potato wedges immediately while they are hot and crisp. They work well as a Side Dish with burgers, grilled meat, chicken or vegetables. Add your favourite sauce or dip alongside.

Recipe Notes

The two-stage soaking process helps remove excess starch and prepares the potatoes for a crisp exterior. Dry the wedges thoroughly after soaking because excess surface moisture will reduce browning in the air fryer.
Shake the basket every 10 minutes during cooking. This exposes different surfaces to the circulating hot air and helps the wedges brown more evenly.

Variations

For additional heat, add chilli powder or cayenne pepper to the seasoning. Garlic powder can also be added alongside the smoked paprika, oregano and onion powder.

Storage Advice

Store leftover wedges in an airtight container in the refrigerator for up to 2 days. Reheat them in the Airfryer until thoroughly hot and crisp again.

Wine Advice

A fresh Sauvignon Blanc works well with the smoky paprika and herbs. If the wedges accompany grilled meat, choose a suitable red wine from Renรฉ’s Wijnbeleving based on the main dish.

Nutrition values

Serving: 230 gr | Calories: 245 kcal | koolhydraten: 43 g | Eiwitten: 5 g | Vet: 7 g | Verzadigd vet: 1 g | Natrium: 210 mg | Suiker: 2 g
————————————————————————————————–

About Crispy Air Fryer Potato Wedges

Crispy Air Fryer Potato Wedges are a simple Potatoes dish made with skin-on potatoes, vegetable oil and a savoury combination of smoked paprika, oregano and onion powder. A two-stage soaking method helps prepare the potatoes before they are cooked until golden and crisp in the air fryer.

Choosing the Potatoes

The original recipe uses four sebago potatoes weighing approximately 850 g in total. Keeping the skins on gives the wedges extra texture and eliminates the need for peeling.

Scrub the potatoes thoroughly before cutting them into evenly sized wedges. Similar-sized pieces are important because they will cook and brown at approximately the same rate.

Why Soak the Potato Wedges?

The preparation begins with a 30-minute soak in cold water. This helps remove some of the excess starch from the cut surfaces of the potatoes.

After draining, the wedges receive a second 15-minute soak in boiling water. This begins softening the exterior and contributes to the contrast between the fluffy centre and crisp surface after air frying.

Drying Before Seasoning

After the second soak, drain the potatoes thoroughly and pat them completely dry with a clean tea towel. This step should not be rushed.

Water remaining on the surface creates steam during cooking. A dry surface allows the oil and seasoning to coat the potatoes properly and encourages better browning.

Seasoning the Wedges

Smoked paprika provides warmth and a subtle smoky flavour, while dried oregano contributes an aromatic herbal note. Onion powder adds savoury depth without introducing additional moisture.

Toss the dried wedges thoroughly with the oil and seasonings so every piece receives an even coating. Finish with sea salt flakes and freshly ground black pepper.

Cooking in the Air Fryer

Preheat the Airfryer to 200ยฐC before adding the potatoes. The wedges need approximately 30 to 40 minutes to become golden and crisp.

Shake the basket every 10 minutes. Moving the wedges during cooking exposes different sides to the circulating hot air and reduces the chance of uneven browning.

Getting Them Extra Crispy

A combination of soaking, thorough drying, a light coating of oil and sufficient space in the basket produces the best texture. If your air fryer basket is small, cook the wedges in batches rather than overcrowding it.

The wedges are ready when the edges are deeply golden and crisp while the centres are soft and fluffy.

Serving Ideas

Potato wedges are an easy accompaniment to burgers, grilled chicken, steak and many other main dishes. They can also be served as a snack with a selection of sauces.

For a Barbecue, they provide a useful alternative to fries and can be prepared indoors while meat or vegetables cook outside.

Sauces and Dips

The original recipe leaves the choice of sauce or dip open. Tomato ketchup, mayonnaise, garlic sauce or a spicy chilli sauce all work well with the smoky seasoning.

Serving several sauces separately also makes the wedges useful for sharing, as everyone can choose their preferred accompaniment.

Preparing Ahead

The potatoes can be cut and placed in the initial cold-water soak ahead of cooking. Keep them refrigerated if they will remain in the water for an extended period.

Complete the hot-water soak and dry the wedges immediately before seasoning and cooking. Once seasoned, they are best transferred directly to the air fryer.

Storing and Reheating

Potato wedges are best served immediately, but leftovers can be refrigerated once completely cool. The surface will soften during storage.

Reheating them in the air fryer is the best way to restore their texture. Cook until thoroughly hot and crisp rather than reheating in a microwave, which tends to leave the wedges soft.

Crispy Air Fryer Potato Wedges combine fluffy potatoes with smoky, savoury seasoning and a crunchy golden exterior. The extra soaking time requires a little patience, but the preparation itself is simple and produces a versatile side dish suitable for everything from family meals to barbecues.

Air Fryer Corn on the Cob


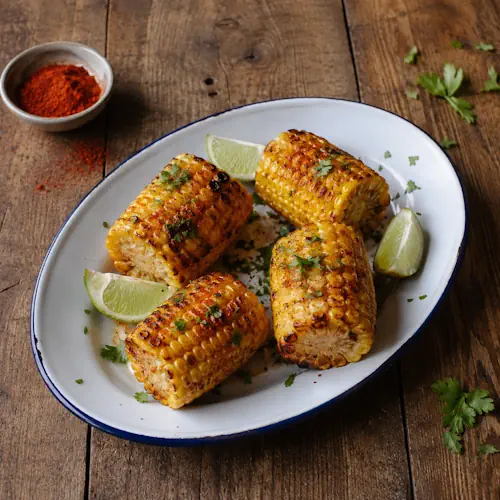
Air-fried corn on the cob with smoked paprika, parsley and lime wedges.

Air Fryer Corn on the Cob

Tender, lightly charred corn on the cob seasoned with smoked paprika, onion powder, salt and black pepper. Fresh parsley and lime add a bright finish to this quick air fryer side dish.
Couverts4
Total time 25 minutes
estimated costs pp $0.70
Deel op Facebook Print Recipe

Equipment

Instructions

  • Rub the corn with the oil.
  • Sprinkle with smoked paprika and onion powder, then season with sea salt flakes and freshly ground black pepper.
  • Toss well to coat evenly.
  • Preheat the air fryer to 180ยฐC.
  • Cook the corn for 15 to 18 minutes, until tender and lightly charred.
  • Transfer to a serving platter, scatter with chopped parsley and serve with lime wedges.

Notes & Wine Advice

Serving Suggestions

Serve the corn hot from the air fryer with fresh lime wedges and chopped parsley. It makes an easy Side Dish for grilled meat, chicken, burgers or other barbecue dishes.

Recipe Notes

Coat the corn evenly with oil before adding the smoked paprika and onion powder. This helps the seasoning adhere to the kernels and encourages light charring during cooking.
Cooking time depends on the size and freshness of the corn. Check after 15 minutes and continue cooking until the kernels are tender and lightly charred.

Variations

Add a pinch of chilli powder for extra heat or increase the smoked paprika for a stronger smoky flavour. Fresh coriander can be used instead of parsley if preferred.

Storage Advice

Store leftover corn in an airtight container in the refrigerator for up to 2 days. Reheat it briefly in the Airfryer until thoroughly hot.

Wine Advice

A fresh Sauvignon Blanc works well with the lime, parsley and smoky paprika. A crisp Pinot Grigio is another good choice for the naturally sweet corn.

Nutrition values

Serving: 100 gr | Calories: 125 kcal | koolhydraten: 20 g | Eiwitten: 3 g | Vet: 5 g | Verzadigd vet: 1 g | Natrium: 190 mg | Suiker: 6 g
————————————————————————————————–

About Air Fryer Corn on the Cob

Air Fryer Corn on the Cob is a quick way to prepare sweet corn with tender kernels and lightly charred edges. The corn is coated with a small amount of oil and seasoned with smoked paprika, onion powder, sea salt and black pepper before being cooked in the Airfryer.

Preparing the Corn

The recipe uses two whole corn cobs cut in half, giving four portions. Pre-cut corn cobs can also be used, making preparation even quicker.

Coating the corn with oil before adding the seasonings helps the spices stick to the kernels. Only a tablespoon is required for the complete recipe.

Adding Smoky Flavour

Smoked paprika provides most of the seasoning character. It gives the corn a warm, smoky flavour that works particularly well with the natural sweetness of the kernels.

Onion powder adds savoury depth without introducing additional moisture. Sea salt and freshly ground black pepper complete the simple seasoning mixture.

Cooking in the Air Fryer

Preheat the air fryer to 180ยฐC before adding the prepared corn. Arrange the pieces so hot air can circulate around them rather than packing them tightly together.

The corn needs approximately 15 to 18 minutes. During this time the kernels become tender while exposed areas begin to brown and char lightly.

Checking for Doneness

Fresh corn does not need to become heavily browned to be ready. Look for plump, tender kernels with a few caramelised or lightly charred areas around the cob.

Larger or particularly thick cobs may require a few additional minutes. Avoid excessive cooking because the kernels can gradually lose their juicy texture.

Finishing with Parsley and Lime

Chopped parsley is scattered over the cooked corn immediately before serving. Its fresh flavour provides a useful contrast to the warm smoked paprika.

Lime wedges are served alongside rather than squeezed over the corn beforehand. This allows each person to add as much acidity as preferred.

Serving Ideas

Corn on the cob is a versatile Vegetables accompaniment. It works particularly well with burgers, grilled chicken, steaks and other dishes typically served at a barbecue.

Because the seasoning is relatively simple, it can accompany strongly flavoured main dishes without competing with them. The lime also makes it particularly suitable alongside spicy foods.

For Barbecues and Picnics

The combination of sweet corn and smoky seasoning makes this an easy choice for a Barbecue. Air frying is also useful when outdoor cooking is impractical or when only a few portions are required.

The corn can be cooked shortly before serving and transferred directly to a platter with lime wedges and fresh parsley.

Making It Spicier

The basic recipe is smoky rather than particularly hot. A pinch of chilli powder or cayenne pepper can be added with the smoked paprika when a spicier version is preferred.

Alternatively, serve chilli sauce separately so the original seasoning remains suitable for everyone at the table.

Storing and Reheating

Leftover cooked corn should be cooled and refrigerated promptly. Store it in a covered container and reheat only the amount required.

The air fryer works particularly well for reheating because it warms the kernels while helping restore some of the lightly charred exterior.

Air Fryer Corn on the Cob turns a handful of simple ingredients into a colourful, versatile vegetable side dish. Smoked paprika and onion provide savoury warmth, while parsley and lime keep the finished corn fresh and lively.