Sweet Potato Jackets with Tahini Yoghurt


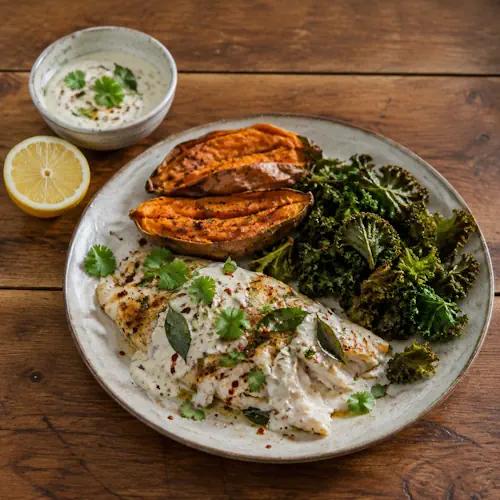
Flaky white fish with roasted sweet potatoes, crisp kale and creamy tahini-yogurt sauce.

Sweet Potato Jackets with Tahini Yoghurt

Crisp-skinned sweet potatoes filled with creamy tahini yoghurt and finished with aromatic curry leaves, chilli and coriander. Maple syrup and lemon give the filling a pleasant balance of sweetness and freshness.
Couverts4
Total time 1 hour 5 minutes
estimated costs pp $1.45
Deel op Facebook Print Recipe

Equipment

Ingredients

Instructions

  • Preheat the air fryer to 200ยฐC.
  • Pierce the sweet potatoes several times with a sharp knife, rub with 1 tablespoon olive oil and season with sea salt flakes and freshly ground black pepper.
  • Drizzle 1 teaspoon olive oil over the garlic bulb, season and wrap in foil.
  • Cook the garlic and sweet potatoes in the air fryer for 35 minutes.
  • Remove the garlic and return the sweet potatoes to the air fryer for a further 15 minutes, or until a knife slides easily through the centre.
  • Combine the yoghurt, tahini, lemon zest and juice and maple syrup in a small bowl.
  • Squeeze the cooled roasted garlic cloves from their skins into the yoghurt mixture and stir well.
  • Toss the curry leaves with the remaining 1 teaspoon olive oil and a pinch of sea salt flakes.
  • Arrange the curry leaves on a small ovenproof plate and cook in the air fryer for 5 to 6 minutes at 200ยฐC, until crisp.
  • Carefully remove the plate.
  • Split the sweet potatoes and fluff the flesh with a fork.
  • Spoon over the tahini yoghurt mixture and top with the crisp curry leaves, chilli flakes and chopped coriander.

Notes & Wine Advice

Serving Suggestions

Serve the sweet potato jackets immediately while the skins are hot and the curry leaves are still crisp. They work well as a Side Dish or a light lunch with a fresh green salad.

Recipe Notes

Piercing the sweet potatoes allows steam to escape during cooking. Cooking time can vary with their size, so test the centre with a sharp knife. It should slide through easily when the potatoes are ready.
Allow the roasted garlic to cool slightly before squeezing the soft cloves into the yoghurt mixture. Roasting mellows the garlic and gives the tahini yoghurt a sweeter, less pungent flavour.

Variations

Adjust the chilli flakes according to taste. For a sharper yoghurt topping, add a little extra lemon juice. The maple syrup can also be reduced if you prefer a less sweet finish.

Storage Advice

Store leftover sweet potatoes and tahini yoghurt separately in airtight containers in the refrigerator for up to 2 days. Reheat the potatoes in the Airfryer and add the chilled yoghurt topping immediately before serving.

Wine Advice

A fresh Sauvignon Blanc complements the lemon, yoghurt and fresh coriander while providing enough acidity to balance the creamy tahini. A dry Riesling is another good match with the sweet potato, maple syrup and mild chilli.

Nutrition values

Serving: 240 g | Calories: 285 kcal | koolhydraten: 36 g | Eiwitten: 7 g | Vet: 14 g | Verzadigd vet: 3 g | Natrium: 190 mg | Suiker: 11 g
————————————————————————————————–

About Sweet Potato Jackets with Tahini Yoghurt

Sweet Potato Jackets with Tahini Yoghurt combine soft, naturally sweet potato with a creamy topping of Greek-style yoghurt, tahini, roasted garlic, lemon and maple syrup. Crisp curry leaves, chilli flakes and coriander finish the dish with contrasting texture and plenty of aromatic flavour.

Cooking Sweet Potatoes in the Air Fryer

Whole sweet potatoes work particularly well in the air fryer. The circulating hot air gradually crisps the skin while the flesh inside becomes soft enough to fluff with a fork.

Pierce each potato several times before cooking. A little olive oil rubbed over the outside encourages browning, while sea salt and black pepper season the skin as it cooks.

Roasting the Garlic

A whole small garlic bulb cooks alongside the potatoes during the first 35 minutes. Wrapping it in foil protects it from the direct heat while allowing the cloves inside to soften.

Once roasted, garlic loses much of its raw sharpness and develops a softer, slightly sweet character. Squeeze the cooked cloves directly from their skins and stir them into the yoghurt mixture.

Making the Tahini Yoghurt

Greek-style yoghurt and tahini create a thick, creamy topping. Tahini contributes the distinctive flavour of sesame, while lemon zest and juice provide enough acidity to keep the mixture fresh.

A tablespoon of maple syrup introduces gentle sweetness. This works especially well because it echoes the natural sweetness of the potato without turning the topping into a sweet sauce.

Crisping the Curry Leaves

Fresh curry leaves are tossed with a small amount of olive oil and sea salt before returning to the hot air fryer. Five to six minutes is enough to make them crisp and aromatic.

Keep an eye on them during this stage because delicate leaves can change from crisp to overly dark quickly. Add them only when serving so they retain their texture.

Finishing the Sweet Potato Jackets

Once the potatoes are tender, split them lengthways and gently fluff the flesh with a fork. This creates a lighter interior and provides plenty of surface for the creamy tahini yoghurt.

Spoon the topping generously over the potatoes, then scatter over the crisp curry leaves, chilli flakes and finely chopped coriander. The combination provides creamy, crisp, sweet, tangy and mildly spicy elements in each serving.

Serving Ideas

These stuffed sweet potatoes can be served as a substantial Vegetables dish alongside a fresh salad. They also work well with grilled vegetables or other small dishes for a shared meal.

For a lighter portion, half a stuffed sweet potato per person is sufficient. For a more substantial meal, increase the quantity of sweet potatoes while keeping the topping generous.

Preparing Ahead

The tahini yoghurt can be prepared several hours in advance and kept refrigerated. The roasted garlic can also be incorporated ahead of time, allowing its flavour to develop throughout the mixture.

The sweet potatoes themselves are best cooked shortly before serving. The curry leaves should always be crisped at the last moment because they soften once they sit against the moist yoghurt.

Storage and Reheating

Keep leftover cooked sweet potatoes separately from the yoghurt topping. Refrigerate both promptly in covered containers.

Reheat the potatoes in the air fryer until thoroughly hot, then add the cold tahini yoghurt, fresh coriander and newly crisped curry leaves. This gives leftovers a much better contrast of temperatures and textures than reheating the assembled dish.

Sweet Potato Jackets with Tahini Yoghurt turn a simple vegetable into a colourful and satisfying dish. Creamy sesame yoghurt, mellow roasted garlic, lemon, maple syrup and crisp curry leaves create layers of flavour while the air fryer produces beautifully tender sweet potatoes with lightly crisp skins.
Air Fryer Garlic Bread


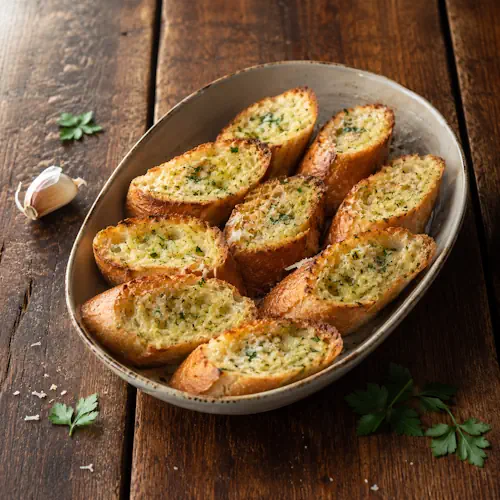
Golden garlic bread with parsley butter and melted Parmesan.

Air Fryer Garlic Bread

Crisp, golden garlic bread made with baguettes or ciabatta, softened butter, fresh garlic, parsley and optional Parmesan. The air fryer gives the bread crunchy edges while keeping the centre warm and buttery.
Couverts4
Total time 20 minutes
estimated costs pp $0.85
Deel op Facebook Print Recipe

Equipment

Ingredients

Instructions

  • If using baguettes, cut diagonal slices along the top at 2 to 3 cm intervals without cutting all the way through.
  • If using ciabatta, cut it in half crosswise, then split each piece horizontally.
  • Combine the softened butter, garlic and parsley in a bowl.
  • Preheat the air fryer to 180ยฐC.
  • Spread the garlic butter over the cut bread and sprinkle with Parmesan, if using.
  • Place the bread on a sheet of foil if preferred, then cook in the air fryer for 8 to 10 minutes, until the bread is golden and crisp and the cheese is melted and lightly browned.
  • Cook in batches if necessary and serve warm.

Notes & Wine Advice

Serving Suggestions

Serve the garlic bread immediately while the edges are crisp and the centre is warm and buttery. It works particularly well alongside pasta, soup, grilled dishes or as part of a shared meal.

Recipe Notes

Use properly softened butter so the garlic and parsley can be distributed evenly. When using baguettes, avoid cutting completely through the bread so the loaf remains together while cooking.
Parmesan is optional, but it adds a savoury, lightly crisp topping. Watch the bread during the final few minutes because both the edges and cheese can brown quickly in an air fryer.

Variations

Add extra parsley for a fresher herb flavour or increase the garlic for a stronger result. The same garlic butter can be used on baguette, ciabatta or another crusty bread.

Storage Advice

Garlic bread is best served freshly cooked. Store leftovers in an airtight container in the refrigerator and reheat briefly in the Airfryer until hot and crisp.

Wine Advice

A fresh Pinot Grigio pairs well with the garlic, butter and Parmesan without overpowering the bread. For a slightly more aromatic alternative, serve with a Sauvignon Blanc.

Nutrition values

Serving: 85 gr | Calories: 275 kcal | koolhydraten: 34 g | Eiwitten: 7 g | Vet: 12 g | Verzadigd vet: 7 g | Natrium: 430 mg | Suiker: 2 g
————————————————————————————————–

About Air Fryer Garlic Bread

Air Fryer Garlic Bread combines crusty bread with a simple mixture of softened butter, fresh garlic and parsley. Parmesan can be scattered over the top for an extra savoury finish. Cooking the bread in the Airfryer produces crisp, browned edges while keeping the centre pleasantly soft and buttery.

Choosing the Bread

The recipe works with either two small baguettes or one ciabatta loaf. Baguettes provide plenty of crisp crust and can be sliced at intervals so the garlic butter melts between the individual sections.

Ciabatta has a more open texture, allowing the butter to soak into its characteristic holes. Cutting it horizontally creates a broad surface for spreading the garlic mixture.

Making the Garlic Butter

Softened butter forms the base of the topping. It should be soft enough to spread easily but not completely melted. Fresh garlic is finely grated or crushed so its flavour is distributed throughout the butter.

Chopped parsley adds freshness and a little colour. Mix the ingredients thoroughly before spreading so every section of bread receives both garlic and herbs.

Preparing Baguettes

When using baguettes, make diagonal cuts at intervals of approximately 2 to 3 cm. Do not slice completely through the bottom of the loaf.

This technique keeps the baguette together while creating spaces for the garlic butter. As the bread heats, the butter melts into the cuts and flavours the soft interior as well as the crust.

Using Ciabatta

For ciabatta, first cut the loaf crosswise and then split each section horizontally. This exposes the open crumb and provides a large surface for the garlic butter.

Spread the mixture evenly rather than concentrating it in one area. This helps the bread brown consistently and prevents individual sections from becoming excessively buttery.

Adding Parmesan

Grated Parmesan is optional, so the garlic bread can be prepared with or without cheese. When used, scatter it evenly over the buttered surface immediately before cooking.

The Parmesan melts and browns in the circulating heat, creating a slightly crisp, savoury topping. Because Parmesan can colour quickly, check the bread toward the end of cooking.

Cooking Garlic Bread in the Air Fryer

Preheat the air fryer to 180ยฐC before adding the prepared bread. Depending on the size of the basket, the bread may need to be cooked in batches.

Eight to ten minutes is usually sufficient. The exact time depends on the thickness and type of bread, so look for crisp golden edges and melted, lightly browned cheese rather than relying solely on the clock.

Using Foil

The recipe allows the bread to be placed on foil if preferred. This can help contain melted butter and makes transferring smaller pieces easier.

Do not completely wrap the bread because exposure to circulating hot air is what gives the surface its crisp finish.

Serving Ideas

Garlic bread is a versatile Side Dish for pasta, soups, salads and grilled dishes. It can also be placed in the centre of the table as part of an informal shared meal.

Serve it immediately after cooking. The contrast between the crisp crust and melted garlic butter is strongest while the bread is still hot.

Preparing Ahead

The garlic butter can be mixed earlier and refrigerated until needed. Allow it to soften before spreading so it does not tear the bread.

The bread can also be sliced beforehand, but assemble it shortly before air frying for the freshest texture.

Storing and Reheating

Leftover garlic bread can be refrigerated once completely cool. Reheating in the air fryer is preferable to microwaving because dry circulating heat restores some of the crisp texture.

Air Fryer Garlic Bread is a quick way to transform simple baguette or ciabatta into a warm, buttery accompaniment. Fresh garlic, parsley and optional Parmesan provide plenty of flavour, while the short cooking time makes it easy to prepare alongside the rest of a meal.

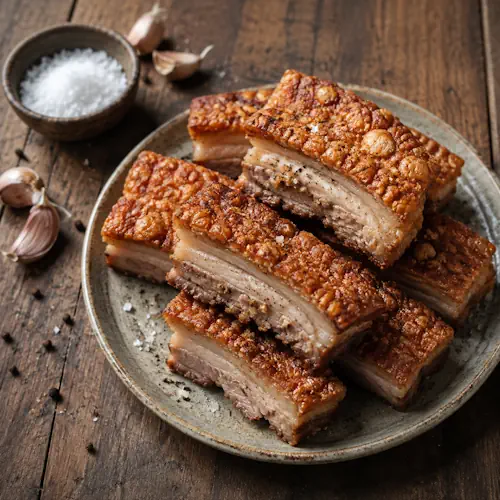
Crispy Air Fryer Pork Belly


Crispy air-fried pork belly with crackling, garlic and sea salt.

Crispy Air Fryer Pork Belly

Crispy pork belly with tender, juicy meat and golden crackling, prepared simply in the air fryer with garlic, salt and black pepper. A straightforward recipe that lets the rich flavour of the pork take centre stage.
Couverts4
Total time 1 hour 5 minutes
estimated costs pp $3.75
Deel op Facebook Print Recipe

Equipment

Instructions

  • Preheat the air fryer to 200ยฐC.
  • Pat the pork belly thoroughly dry with paper towels and score the skin, taking care not to cut through the meat.
  • Rub the pork belly with vegetable oil, garlic powder, sea salt flakes and freshly ground black pepper.
  • Place the pork belly skin-side up in the air fryer and cook for 30 minutes, until the skin begins to crisp.
  • Reduce the temperature to 180ยฐC.
  • Cook for a further 20 to 30 minutes, until the pork is cooked through and the crackling is crisp.
  • Rest briefly before slicing and serving.

Notes & Wine Advice

Serving Suggestions

Slice the pork belly after resting and serve while the crackling is still crisp. It works well with roasted or steamed Vegetables, a fresh salad or potatoes for a more substantial meal.

Recipe Notes

Dry skin is essential for good crackling. Pat the pork belly thoroughly with paper towels before adding the oil and seasoning. When scoring the rind, cut through the skin without slicing deeply into the meat.
The original recipe gives a weight range of 750 g to 1 kg. A larger or particularly thick piece may require the full additional 30 minutes at 180ยฐC.

Cooking Advice

Starting at 200ยฐC helps the skin begin to blister and crisp. Reducing the temperature to 180ยฐC allows the pork underneath to finish cooking without burning the crackling. If necessary, extend the cooking time until the meat is thoroughly cooked and the skin is crisp.

Storage Advice

Store leftover pork belly in an airtight container in the refrigerator for up to 2 days. Reheat it in the Airfryer so the crackling has a chance to become crisp again.

Wine Advice

A fruity Pinot Noir works well with rich pork belly because its freshness helps balance the fat. A crisp Riesling is an excellent white-wine alternative, particularly when the pork is served with fresh or lightly seasoned vegetables.

Nutrition values

Serving: 220 gr | Calories: 720 kcal | koolhydraten: 1 g | Eiwitten: 31 g | Vet: 66 g | Verzadigd vet: 23 g | Natrium: 520 mg | Suiker: 0 g
————————————————————————————————–

About Crispy Air Fryer Pork Belly

Crispy Air Fryer Pork Belly turns a simple piece of Pork into a rich main course with juicy meat and crisp golden crackling. The ingredient list is deliberately short: pork belly, vegetable oil, garlic powder, sea salt and black pepper. Most of the character comes from the contrast between the tender meat and crunchy skin.

Choosing the Pork Belly

The recipe uses a 750 g to 1 kg piece of pork belly. Look for a piece with an even layer of skin and a good balance between meat and fat. An evenly shaped piece will generally cook more consistently than one that varies considerably in thickness.

The skin is particularly important because it becomes the crackling. If possible, choose pork belly with clean, dry skin that has not been covered in a wet marinade.

Preparing the Skin

Before seasoning, pat the pork belly thoroughly dry with paper towels. Moisture is the enemy of crisp crackling because the surface needs dry heat to blister and become crunchy.

Score the rind carefully without cutting deeply into the meat. The cuts allow heat to reach more of the skin and give the rendered fat somewhere to escape during cooking.

Simple Seasoning

Only a small amount of vegetable oil is needed. Rub it over the pork together with garlic powder, sea salt flakes and freshly ground black pepper.

The salt does more than provide flavour. It also helps draw moisture from the surface of the skin, contributing to a crisper finish. There is no need for a complicated spice mixture because pork belly already has plenty of richness.

Starting at High Heat

The pork belly begins cooking at 200ยฐC. This initial high-temperature stage lasts approximately 30 minutes and is designed to start crisping the rind.

During this period, fat beneath the skin begins to render and the surface gradually develops the blistered appearance associated with good crackling.

Finishing at a Lower Temperature

After the first 30 minutes, reduce the air fryer temperature to 180ยฐC. Continue cooking for another 20 to 30 minutes, depending on the size and thickness of the pork.

This second stage gives the meat time to cook through while reducing the risk of burning the already crisping surface. The finished crackling should be firm and crunchy rather than leathery.

Why the Air Fryer Works Well

The Airfryer circulates hot air rapidly around the pork, making it particularly effective for foods where a crisp exterior is wanted. Pork belly benefits from this because the circulating heat encourages the rind to dry and crisp while excess fat renders away.

The compact cooking chamber also reaches temperature quickly, making this a practical alternative to heating a full-size oven for a relatively small piece of meat.

Resting and Slicing

Allow the pork belly to rest briefly after cooking. Resting makes the meat easier to slice and allows the juices to settle.

Use a sharp knife to cut through the crackling cleanly. Serving the pork soon after resting gives the best contrast between hot, juicy meat and crisp skin.

Serving Ideas

Because pork belly is naturally rich, fresh or simply cooked accompaniments work particularly well. Steamed greens, cabbage, roasted vegetables or a sharp salad can balance the fattiness of the meat.

Potatoes or rice can be added for a larger meal. A fresh, acidic sauce or dressing is another useful way to contrast with the richness of the pork.

Storing and Reheating

Cool leftovers promptly and refrigerate them in a covered container. The crackling will naturally soften somewhat during refrigeration.

For reheating, the air fryer is preferable to a microwave because dry circulating heat can restore some of the crisp texture. Heat only until the pork is thoroughly hot to avoid unnecessarily drying the meat.

Food Safety

Keep raw pork refrigerated until preparation and clean knives, boards and surfaces thoroughly after contact with raw meat. Cook the pork thoroughly before serving and refrigerate leftovers promptly.

For current guidance about handling, cooking and storing meat safely, consult the U.S. Food and Drug Administration food-safety information.

Crispy Air Fryer Pork Belly is built around a simple technique rather than a long ingredient list. Drying and scoring the skin, beginning with high heat and then lowering the temperature produces the combination that matters most: crisp crackling surrounding rich, tender pork.

Air Fryer Yorkshire Puddings


Golden Yorkshire puddings fresh from the oven with gravy, rosemary and flaky salt.

Air Fryer Yorkshire Puddings

Light, golden Yorkshire puddings with crisp edges and soft, airy centres, cooked quickly in the air fryer. A classic English accompaniment made with just flour, eggs, milk and a little oil.
Couverts4
Total time 30 minutes
estimated costs pp $0.40
Deel op Facebook Print Recipe

Equipment

Ingredients

Instructions

  • Divide the oil between four heatproof pudding moulds and heat them in the air fryer for 5 minutes, until very hot.
  • Meanwhile, whisk the flour and eggs together in a jug or bowl.
  • Gradually whisk in the milk until the batter is smooth.
  • Season with sea salt flakes and freshly ground black pepper.
  • Carefully pour the batter into the hot moulds, filling each approximately three-quarters full.
  • Cook in the air fryer for 12 minutes, until puffed, golden and cooked through.
  • Serve immediately while hot and crisp.

Notes & Wine Advice

Serving Suggestions

Serve the Yorkshire puddings immediately while they are puffed and crisp. They are traditionally served alongside roast meat, vegetables and gravy and make an excellent addition to a Family Dinner.

Recipe Notes

Heating the oil and moulds before adding the batter is essential. The batter should begin cooking as soon as it hits the hot oil, helping the Yorkshire puddings rise and develop crisp edges.
Do not overfill the moulds. Filling them approximately three-quarters full gives the batter enough room to expand during cooking.

Serving Advice

Yorkshire puddings are at their best straight from the air fryer. Serve them with a traditional roast dinner, sausages and gravy, or use them as individual cups for savoury fillings.

Storage Advice

Allow leftover Yorkshire puddings to cool completely before storing them in an airtight container in the refrigerator for up to 2 days. Reheat them briefly in the air fryer until hot and crisp. They can also be frozen and reheated directly from frozen.

Wine Advice

The best wine depends mainly on what is served with the Yorkshire puddings. With roast beef, a Cabernet Sauvignon is a good match, while a Merlot provides a softer alternative.

Nutrition values

Serving: 75 g | Calories: 150 kcal | koolhydraten: 18 g | Eiwitten: 6 g | Vet: 6 g | Verzadigd vet: 2 g | Natrium: 115 mg | Suiker: 2 g
————————————————————————————————–
Course; Bread / Side Dish
Cuisine; England / European
Season: All Seasons

About Air Fryer Yorkshire Puddings

Air Fryer Yorkshire Puddings are a quick version of one of the best-known accompaniments from England. A simple batter of flour, eggs and milk is poured into very hot oiled moulds, where it rapidly expands to produce the characteristic golden exterior and light centre.

A Classic English Side Dish

Yorkshire puddings have long been associated with traditional roast dinners. Despite the word โ€œpuddingโ€ in the name, they are savoury rather than sweet and are commonly served with meat, vegetables and plenty of gravy.

The basic batter contains only a handful of everyday ingredients. What makes the finished puddings distinctive is the combination of a thin batter, very hot oil and intense heat during cooking.

Making the Batter

The flour and eggs are whisked together first before the milk is gradually incorporated. Adding the milk gradually makes it easier to create a smooth batter without lumps.

Season the mixture simply with sea salt flakes and freshly ground black pepper. Yorkshire pudding batter does not need herbs or spices because it is normally served alongside strongly flavoured savoury dishes.

Why Hot Oil Matters

The small amount of oil is divided among four heatproof pudding moulds and heated in the air fryer before the batter is added. This is one of the most important parts of the recipe.

When the batter meets the hot oil, it immediately begins to cook around the edges. The rapid heat encourages steam to form inside the batter, helping the puddings expand and creating their characteristic shape.

Cooking in the Air Fryer

Using an air fryer provides strong circulating heat around the individual moulds. Once filled, the Yorkshire puddings need approximately 12 minutes to become puffed, golden and cooked through.

Avoid repeatedly opening the air fryer during the early stages of cooking. A sudden loss of heat can interfere with the rise before the structure of the puddings has set.

Getting a Crisp Exterior

A good Yorkshire pudding should have a crisp, deeply golden exterior while remaining lighter inside. Starting with properly heated moulds and oil is more important than adding extra fat.

Leaving enough room in each mould is equally useful. Filling them around three-quarters full allows the batter to climb and expand rather than overflowing.

Serving Yorkshire Puddings

Yorkshire puddings are traditionally served hot as part of a roast dinner. Their hollow centres and crisp edges are particularly good at catching gravy and meat juices.

They can also be served with sausages, roasted vegetables or other savoury dishes. Larger Yorkshire puddings can even be used as edible containers for meat and gravy fillings.

Preparing Ahead

The batter can be mixed before the rest of the meal is ready, allowing the actual cooking to take place shortly before serving. This is useful because Yorkshire puddings are best when freshly cooked.

Have the remaining meal ready before the puddings finish so they can go directly from the air fryer to the table without sitting and losing their crisp texture.

Storing and Reheating

If Yorkshire puddings are left over, cool them completely before storing. Reheating them in the air fryer is particularly effective because the circulating hot air helps restore their crisp exterior.

They can also be frozen once completely cool. Reheat from frozen until thoroughly hot and crisp rather than allowing them to thaw and become soft.

Air Fryer Yorkshire Puddings turn a traditional English favourite into a convenient small-batch recipe. With a simple batter, properly heated oil and a short cooking time, they produce the puffed shape and crisp golden edges that make Yorkshire puddings such a popular addition to a family roast dinner.

Sumac Beef Koftas


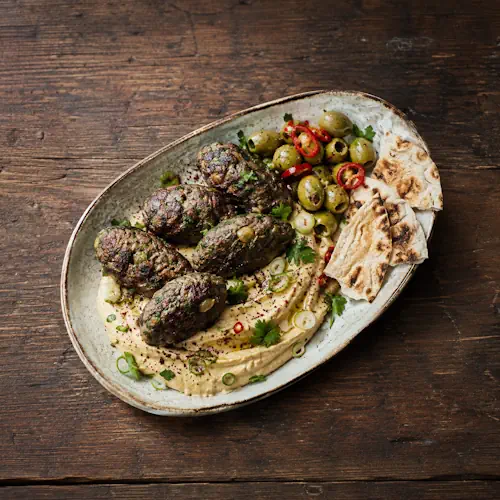
Beef koftas with green olives, hummus, flatbread, parsley and sumac.

Sumac Beef Koftas

Juicy beef koftas flavoured with green olives, pistachios, sumac, cumin, coriander and cinnamon. Served with a fresh cucumber, parsley and pomegranate salad, toasted flatbreads, hummus and pickled chillies.
Couverts4
Total time 30 minutes
estimated costs pp $4.75
Deel op Facebook Print Recipe

Equipment

Ingredients

Instructions

  • Combine the beef mince, garlic, green olives, pistachios, sumac, cumin, coriander, cinnamon and chilli powder in a large bowl.
  • Season with sea salt flakes and freshly ground black pepper.
  • Shape the mixture into 24 koftas using approximately 2 tablespoons of mixture for each.
  • Preheat the air fryer to 200ยฐC.
  • Arrange the koftas in the air fryer basket lined with baking paper, working in batches if necessary.
  • Brush lightly with olive oil and air fry for 9 to 10 minutes, turning halfway through, until caramelised and cooked through.
  • Meanwhile, combine the red onion, cucumber, parsley and pomegranate seeds in a large bowl.
  • Add the lemon juice, season with sea salt flakes and freshly ground black pepper and toss to combine.
  • Sprinkle the salad with an extra pinch of sumac.
  • Spread hummus over a serving platter and arrange the koftas on top.
  • Serve with the cucumber and pomegranate salad, pickled chillies and toasted flatbreads.

Notes & Wine Advice

Serving Suggestions

Spread the hummus over a large serving platter and arrange the hot koftas on top. Serve with the cucumber, parsley and pomegranate salad, toasted flatbreads and pickled chillies. The koftas work particularly well as a Main Course or as part of a larger shared meal.

Recipe Notes

Do not overwork the beef mixture when combining the ingredients, as this can make the koftas firmer. Roughly chopped green olives and pistachios should remain visible and provide both flavour and texture.
Cook the koftas in batches if necessary. Leaving enough space around them allows the hot air to circulate and helps the outside caramelise while the centre remains juicy.

Serving Advice

The fresh cucumber, parsley and pomegranate salad provides an important contrast to the rich Beef. Add the lemon juice shortly before serving and finish with an extra pinch of sumac for additional citrus-like sharpness.

Storage Advice

Store leftover cooked koftas separately from the salad, hummus and flatbreads in an airtight container in the refrigerator for up to 2 days. Reheat the koftas thoroughly in the air fryer or oven before serving. Keep the salad chilled and serve it cold.

Wine Advice

A fruity Syrah works particularly well with the beef, sumac, cumin and coriander. A Grenache is another good choice, with enough fruit and spice to complement the koftas, olives and pomegranate.

Nutrition values

Serving: 390 g | Calories: 675 kcal | koolhydraten: 37 g | Eiwitten: 48 g | Vet: 39 g | Verzadigd vet: 11 g | Natrium: 1020 mg | Suiker: 6 g
————————————————————————————————–

About Sumac Beef Koftas

Sumac Beef Koftas combine minced Beef with green olives, pistachios and a fragrant mixture of sumac, cumin, coriander, cinnamon and mild chilli. The small koftas are cooked quickly in the air fryer and served over hummus with a fresh cucumber, parsley and pomegranate salad. Toasted flatbreads and pickled chillies complete the meal.

Building the Kofta Mixture

The beef forms the base of the koftas, but the chopped green olives and pistachios make this version particularly distinctive. The olives contribute saltiness and moisture, while the pistachios add a subtle nutty flavour and contrasting texture.

Garlic is grated directly into the mixture so its flavour is distributed evenly. Combine everything gently rather than repeatedly kneading the mince.

The Importance of Sumac

Sumac is central to the flavour of these koftas. The spice has a naturally tart, citrus-like character that works particularly well with rich meat and is widely used in cooking from the Middle East.

Two tablespoons are incorporated into the beef mixture, while another pinch is scattered over the accompanying salad. This links the rich koftas and fresh vegetables without requiring a heavy sauce.

Warm Spices and Fresh Flavours

Ground cumin, coriander, cinnamon and mild chilli powder provide warmth and depth. None needs to dominate the mixture. Together they create an aromatic background for the beef, olives and pistachios.

The lemon, cucumber, parsley and pomegranate on the side provide a completely different set of flavours. Their freshness helps balance the richness of the meat and hummus.

Shaping the Koftas

The mixture makes approximately 24 small koftas, giving six per serving. Using about 2 tablespoons of mixture for each helps keep them similar in size so they cook evenly.

Compact them sufficiently to hold their shape but avoid squeezing them excessively. Small koftas cook quickly and also work well when this dish is served as part of a shared platter.

Cooking in the Air Fryer

The Airfryer is preheated to 200ยฐC before cooking. Brush the koftas lightly with olive oil and arrange them in a single layer.

They need approximately 9 to 10 minutes, with a turn halfway through. Depending on the size of the air fryer, several batches may be necessary. Avoid overcrowding because good air circulation helps create the caramelised exterior.

Making the Fresh Salad

Finely sliced cucumber and red onion are combined with generous handfuls of parsley and jewel-like pomegranate seeds. Lemon juice provides the dressing, while an extra pinch of sumac reinforces the tart flavour already present in the koftas.

This simple salad does not need oil because the hummus and beef already provide richness. Keep it fresh and lightly dressed so it remains crisp.

Serving with Hummus

Instead of serving hummus separately, spread it directly over the platter and place the cooked koftas on top. The creamy hummus provides a smooth contrast to both the caramelised meat and crunchy pistachios.

Pickled chillies add acidity and heat, while toasted flatbreads make it easy to scoop up the koftas, hummus and salad together.

A Shared Main Course

This recipe works particularly well for a Family Dinner because the different components can be arranged on one large platter. Everyone can combine the koftas, hummus, salad, chillies and flatbread according to preference.

The presentation also makes the recipe suitable for informal entertaining. The koftas can be cooked in batches while the cold components are prepared ahead.

Preparing Ahead

The raw kofta mixture can be combined and shaped earlier in the day and kept covered in the refrigerator until cooking. The cucumber and onion can also be prepared ahead, although the lemon juice is best added shortly before serving.

Hummus, pickled chillies and flatbreads require very little last-minute preparation, leaving only the air frying and final assembly to complete.

Food Safety

Keep raw minced beef refrigerated and separate from salad ingredients and other foods that will be served without further cooking. Wash hands, utensils and preparation surfaces thoroughly after handling the raw meat.

Sumac Beef Koftas bring together aromatic spices, salty olives, crunchy pistachios, creamy hummus and a bright pomegranate salad. It is a colourful Main Course built around contrasting flavours and textures, with the air fryer making the koftas particularly quick to cook.

Kimchi Chicken Schnitzels


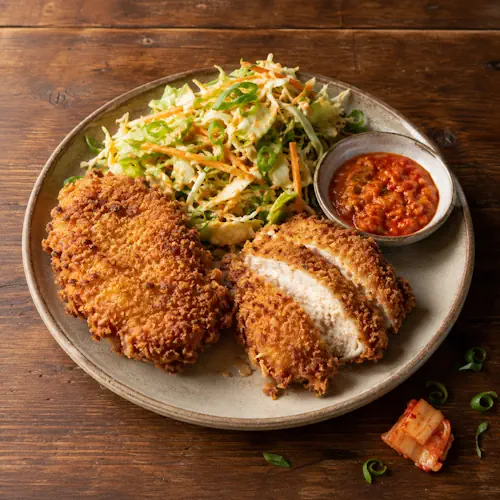
Crispy panko chicken schnitzels served with kimchi sauce and crunchy cabbage slaw.

Kimchi Chicken Schnitzels

Crispy chicken schnitzels marinated in kimchi brine, coated with panko breadcrumbs and served with a crunchy kimchi cabbage slaw and spicy mayonnaise. A Korean-inspired chicken dish with plenty of crunch, heat and tang.
Couverts4
Total time 2 hours 55 minutes
estimated costs pp $3.50
Deel op Facebook Print Recipe

Equipment

Ingredients

Instructions

  • Butterfly the chicken breasts by slicing through the thickest part of each breast, stopping 1 cm before the edge, then open them out.
  • Cover with baking paper and flatten with a rolling pin until thin.
  • Place the chicken and kimchi brine in a large container and refrigerate for at least 2 hours or up to 24 hours.
  • Place the flour in one shallow bowl and season lightly with sea salt flakes.
  • Whisk the eggs in a second shallow bowl.
  • Place the panko breadcrumbs in a third shallow bowl.
  • Remove the chicken from the brine and coat each piece first in flour, then egg and finally breadcrumbs, pressing firmly to coat.
  • Place on a wire rack lined with baking paper and freeze for 20 minutes.
  • Meanwhile, combine the finely sliced cabbage, chopped kimchi, mayonnaise and rice vinegar in a bowl.
  • Season the slaw with sea salt flakes.
  • Preheat the air fryer to 200ยฐC.
  • Cook the schnitzels in batches for 12 to 15 minutes, turning halfway through, until golden and completely cooked through.
  • Serve with the kimchi slaw, spicy mayonnaise and lemon wedges.

Notes & Wine Advice

Serving Suggestions

Serve the schnitzels hot and crisp with a generous portion of kimchi cabbage slaw, spicy mayonnaise and fresh lemon wedges. They make a substantial Chicken dinner on their own, but can also be served with rice or extra vegetables.

Recipe Notes

Flatten the chicken evenly so the schnitzels cook at the same rate. Press the panko breadcrumbs firmly onto the chicken to create a generous, crunchy coating. Freezing the breaded schnitzels for 20 minutes helps the coating stay in place during air frying.

Marinating Advice

Allow at least 2 hours for the chicken to marinate in the kimchi brine. For a stronger flavour, it can remain refrigerated in the brine for up to 24 hours before breading and cooking.

Storage Advice

Store leftover cooked schnitzels and kimchi slaw separately in airtight containers in the refrigerator for up to 2 days. Reheat the chicken in the Airfryer until thoroughly hot and crisp. Keep the slaw chilled and serve it cold.

Wine Advice

A slightly aromatic Riesling works particularly well with the spicy, tangy kimchi and rich fried coating. Its freshness also balances the mayonnaise-based slaw.

Nutrition values

Serving: 340 g | Calories: 610 kcal | koolhydraten: 52 g | Eiwitten: 48 g | Vet: 24 g | Verzadigd vet: 4 g | Natrium: 1150 mg | Suiker: 6 g
————————————————————————————————–

About Kimchi Chicken Schnitzels

Kimchi Chicken Schnitzels combine the familiar crunch of breaded chicken with the bold flavours of Korean kimchi. The Chicken is first marinated in kimchi brine, then coated in flour, egg and panko breadcrumbs before being cooked until crisp and golden in the air fryer. A fresh cabbage and kimchi slaw completes the dish.

Preparing the Chicken

Butterflying the chicken breasts creates thinner pieces that are easier to turn into schnitzels. After cutting each breast almost completely through, open it out and place it between sheets of baking paper.

Use a rolling pin to gently flatten the chicken. Aim for an even thickness across each piece rather than making the meat excessively thin. Even thickness is particularly useful when cooking several schnitzels because they will reach doneness at approximately the same time.

Marinating in Kimchi Brine

Instead of using a conventional marinade, this recipe takes advantage of the liquid from the kimchi. Three tablespoons of kimchi brine are combined with the prepared chicken and left refrigerated for at least 2 hours.

The chicken can remain in the marinade for up to 24 hours. This makes the recipe convenient when some of the preparation needs to be completed the day before cooking.

Creating the Crispy Coating

The schnitzels use the traditional three-stage breading method. The chicken is first coated in seasoned flour, followed by beaten egg and finally panko breadcrumbs.

Panko breadcrumbs have a relatively coarse texture and create a particularly crisp exterior. Press them firmly onto the chicken so the coating adheres properly.

Why Freeze Before Cooking?

After breading, the chicken is placed on a lined wire rack and frozen for 20 minutes. This short chilling period firms the coating and helps prevent it from separating from the chicken during cooking.

The schnitzels are not intended to freeze completely. Twenty minutes is enough to make the exterior firmer while leaving the chicken ready for immediate cooking.

Cooking in the Air Fryer

Preheat the Airfryer to 200ยฐC before adding the schnitzels. Cook them in batches rather than overcrowding the basket, as good air circulation is essential for an evenly crisp coating.

Turn the chicken halfway through the 12 to 15 minute cooking time. The coating should be golden and crisp and the chicken must be completely cooked through before serving.

Making the Kimchi Slaw

The accompanying slaw combines finely sliced white cabbage with chopped kimchi, mayonnaise and rice vinegar. The cabbage supplies plenty of crunch, while kimchi contributes acidity, chilli heat and its distinctive fermented flavour.

Rice vinegar adds further acidity to balance the mayonnaise. Season carefully because kimchi itself can already contain a significant amount of salt.

Serving the Schnitzels

Serve one schnitzel per person with the kimchi slaw alongside. Spicy mayonnaise reinforces the chilli flavour, while fresh lemon wedges provide a sharp citrus contrast to the breaded chicken.

Rice or additional Vegetables can be added when you want a larger meal, although the chicken and cabbage slaw already make a substantial combination.

Korean-Inspired Flavours

Kimchi gives these schnitzels their connection with Korea. Its combination of fermented vegetables, chilli and acidity transforms both the chicken marinade and the creamy cabbage slaw.

The result combines two very different ideas: a crisp European-style schnitzel and the distinctive flavour of Korean kimchi. Panko breadcrumbs provide an especially crunchy bridge between the two.

Preparing Ahead

The chicken can be butterflied and placed in the kimchi brine the day before cooking. The cabbage can also be sliced ahead, although the finished slaw is best mixed closer to serving so it retains more crunch.

Bread the chicken after marinating, then give it the specified 20 minutes in the freezer before cooking. This keeps the preparation organised without compromising the crisp coating.

Food Safety

Keep the raw chicken refrigerated throughout the marinating process and prevent it from coming into contact with the cabbage, kimchi slaw or other ready-to-eat ingredients. Wash hands, utensils and preparation surfaces thoroughly after handling raw poultry.

For current guidance about safely preparing and cooking poultry, consult the U.S. Food and Drug Administration food-safety information.

Kimchi Chicken Schnitzels bring together juicy marinated poultry, crisp panko breadcrumbs and a tangy cabbage slaw in one satisfying Main Course. The air fryer keeps the coating crisp, while kimchi, spicy mayonnaise and lemon give the finished dish plenty of freshness and character.

Smoked Seafood Pรขtรฉ


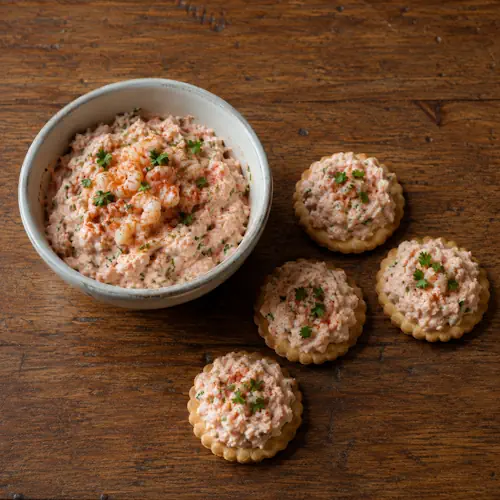
Creamy seafood pรขtรฉ with salmon, prawns, crab, parsley and paprika on crisp canapรฉ bases.

Smoked Seafood Pรขtรฉ

A quick and creamy seafood pรขtรฉ made with smoked kippers or sardines, horseradish, cream cheese, crรจme fraรฎche, lemon and paprika. Ready in minutes and ideal for spreading onto canapรฉ bases, crackers or toast.
Couverts4
Total time 10 minutes
estimated costs pp $2.25
Deel op Facebook Print Recipe

Equipment

Ingredients

Instructions

  • Drain the smoked fish and place it in a bowl.
  • Add the horseradish cream, lemon zest and juice, cream cheese, crรจme fraรฎche and paprika.
  • Blend until smooth.
  • Season with freshly ground black pepper.
  • Stir through the finely chopped parsley.
  • Spoon onto your chosen canapรฉ base and finish with a pinch of parsley.

Notes & Wine Advice

Serving Suggestions

Spoon the pรขtรฉ onto your chosen canapรฉ bases and finish with a little chopped parsley. It can also be served as a Dips option with crackers, toasted bread or vegetable sticks, or as part of a larger Appetizer selection.

Recipe Notes

Drain the smoked fish thoroughly before blending so the pรขtรฉ does not become too loose. The cream cheese and crรจme fraรฎche soften the smoky flavour, while horseradish, lemon and paprika give the mixture a sharper finish.

Fish Options

The original recipe allows smoked kippers, sardines or smoked trout. Each produces a slightly different flavour, so use whichever is available or preferred. Taste before adding additional seasoning because smoked fish can already be quite salty.

Storage Advice

Keep the seafood pรขtรฉ refrigerated in an airtight container and use within 1 day for the best quality. Add it to canapรฉ bases shortly before serving so they remain crisp.

Wine Advice

A crisp Sauvignon Blanc works particularly well with the smoked fish, lemon and horseradish. A fresh Pinot Grigio is another suitable choice, especially with the creamy texture of the pรขtรฉ.

Nutrition values

Serving: 115 gr | Calories: 245 kcal | koolhydraten: 4 g | Eiwitten: 20 g | Vet: 17 g | Verzadigd vet: 8 g | Natrium: 620 mg | Suiker: 2 g
————————————————————————————————–

About Smoked Seafood Pรขtรฉ

Smoked Seafood Pรขtรฉ is a quick, creamy preparation combining smoked Fish with cream cheese, crรจme fraรฎche, horseradish, lemon and paprika. Fresh parsley provides a simple herbal finish. Because everything is blended together, the pรขtรฉ takes only a few minutes to prepare and works particularly well for canapรฉs and appetiser platters.

Choosing the Smoked Fish

The recipe gives several choices for the main ingredient: smoked kippers in brine, sardines or smoked trout. Each option changes the character of the pรขtรฉ slightly. Kippers provide a pronounced smoky flavour, sardines are rich and savoury, while smoked trout gives the mixture a somewhat more delicate character.

Whichever fish you choose, drain it thoroughly before blending. Excess liquid can make the finished pรขtรฉ thinner than intended.

Creating the Creamy Texture

Cream cheese and crรจme fraรฎche form the creamy base of the pรขtรฉ. Together they soften the stronger flavour of the smoked seafood without masking it completely.

Blend the mixture until smooth for an elegant canapรฉ topping. If you prefer more texture, stop blending while a few small pieces of fish are still visible.

Lemon, Horseradish and Paprika

Horseradish cream adds gentle heat that works particularly well with smoked Seafood. Lemon zest and juice provide freshness and acidity, helping to balance the richness of both the fish and dairy ingredients.

Paprika adds another savoury layer without overpowering the fish. Freshly ground black pepper can be added to taste, but additional salt may not be necessary because smoked fish is naturally salty.

Finishing with Fresh Parsley

Finely chopped parsley is stirred through after blending rather than processed completely into the pรขtรฉ. This preserves some of its fresh flavour and gives the creamy mixture small flecks of colour.

Reserve a little extra parsley for scattering over the finished canapรฉs just before serving.

Serving as Canapรฉs

The pรขtรฉ can be spooned directly onto prepared canapรฉ bases. Crisp toast, crackers or small vegetable bases all work well. Keep the portions relatively small because smoked fish and cream cheese provide plenty of flavour.

For a Party or Birthday, prepare the pรขtรฉ beforehand and assemble the individual canapรฉs shortly before guests arrive.

Serving as a Dip or Spread

The same mixture can be served in a small bowl rather than on individual bases. Surround it with crackers, toasted bread or crisp vegetables and allow guests to help themselves.

This makes the recipe flexible enough to serve as an appetiser, snack, canapรฉ topping or part of a larger buffet.

Preparing Ahead

Smoked Seafood Pรขtรฉ requires no cooking, making it particularly useful when several different appetisers need to be prepared. The complete mixture can be blended ahead and kept chilled until required.

Cover it carefully to prevent the pรขtรฉ from drying out or transferring its smoked aroma to other foods in the refrigerator.

Food Safety

Keep the smoked seafood and finished pรขtรฉ refrigerated and avoid leaving the dairy-based mixture at room temperature for extended periods. Use clean utensils when preparing and serving the pรขtรฉ.

For current information about selecting, storing and preparing seafood safely, consult the U.S. Food and Drug Administration food-safety information.

Smoked Seafood Pรขtรฉ turns a handful of strongly flavoured ingredients into an easy, versatile canapรฉ topping. Smoky fish, creamy cheese, fresh lemon and horseradish create a balanced spread that is particularly convenient for parties and other occasions where small appetisers are served.

Whipped Blue Cheese Honey Dip


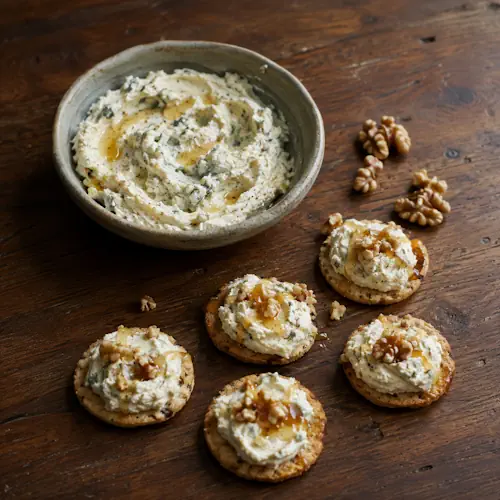
Creamy whipped blue cheese with walnuts and honey served on crisp canapรฉ bases.

Whipped Blue Cheese Honey Dip

A creamy whipped dip combining blue cheese, ricotta and crรจme fraรฎche with freshly ground black pepper. Finished with a drizzle of honey, it balances salty, tangy and sweet flavours and can be prepared several days ahead.
Couverts4
Total time 5 minutes
estimated costs pp $1.35
Deel op Facebook Print Recipe

Equipment

  • Food processor
  • serving bowl
  • spatula

Ingredients

Instructions

  • Place the blue cheese, ricotta and crรจme fraรฎche in a bowl and blend until smooth.
  • Season lightly with freshly ground black pepper.
  • Transfer the mixture to an airtight container and refrigerate for up to 3 days.
  • Spoon the whipped blue cheese mixture into a serving bowl shortly before serving.
  • Drizzle generously with honey and serve.

Notes & Wine Advice

Serving Suggestions

Serve the whipped blue cheese in a small bowl with a generous drizzle of honey. It works well as an Appetizer or Dip with crackers, toasted bread, vegetable sticks or canapรฉ bases.

Recipe Notes

Blend the blue cheese, ricotta and crรจme fraรฎche until completely smooth and creamy. Add the black pepper gradually because blue cheese already provides plenty of strong, savoury flavour.

Variations

Adjust the balance of blue cheese and ricotta to make the dip stronger or milder. The honey can also be served separately so everyone can choose how much sweetness to add.

Storage Advice

Transfer the whipped cheese mixture to an airtight container and refrigerate for up to 3 days. Add the honey only when serving. Stir the mixture briefly if it has been stored overnight.

Wine Advice

A fresh Riesling provides a good contrast to the salty blue cheese and works particularly well with the honey. A Sauvignon Blanc is a fresher alternative for the creamy ricotta and crรจme fraรฎche.

Nutrition values

Serving: 60 g | Calories: 175 kcal | koolhydraten: 6 g | Eiwitten: 7 g | Vet: 14 g | Verzadigd vet: 9 g | Natrium: 330 mg | Suiker: 5 g
————————————————————————————————–

About Whipped Blue Cheese Honey Dip

Whipped Blue Cheese Honey Dip is a simple combination of blue cheese, ricotta and crรจme fraรฎche blended until smooth and finished with freshly ground black pepper and honey. The result combines the distinctive salty flavour of Cheese with a creamy texture and contrasting sweetness.

Creating the Creamy Base

Blue cheese provides the strongest flavour in the recipe, while ricotta softens its intensity and gives the mixture body. Crรจme fraรฎche adds extra creaminess and a subtle tang. Blending the three ingredients together creates a much lighter texture than serving blue cheese on its own.

The proportions also keep the blue cheese noticeable without allowing it to completely dominate the dip. This makes the finished mixture suitable for serving in small portions as part of an appetiser selection.

Seasoning the Dip

Freshly ground black pepper is the only additional savoury seasoning required. Blue cheese already contains a significant amount of salt, so additional salt is unnecessary.

Add the pepper gradually and taste before adding more. Different varieties of blue cheese vary considerably in strength, saltiness and sharpness.

Why Honey Works with Blue Cheese

Honey provides a sweet contrast to the salty, tangy cheese. Rather than blending it through the mixture, the recipe calls for honey to be drizzled over the top immediately before serving.

This keeps the flavours distinct and allows each spoonful to contain a slightly different balance of creamy cheese and sweetness.

Serving as an Appetizer

The whipped mixture makes an easy Appetizer for entertaining. Serve it in a small bowl surrounded by crackers, toasted bread, vegetable sticks or canapรฉ bases.

It can also form part of a larger selection of small dishes for a party. Because the flavour is relatively rich, modest portions are usually sufficient.

Preparing Ahead

One of the advantages of this recipe is that the cheese mixture can be prepared well in advance. The original recipe allows it to be refrigerated in an airtight container for up to 3 days.

This makes it particularly useful for a Party or Birthday. Transfer it to the serving bowl and add the honey shortly before guests are ready to eat.

Texture and Temperature

The mixture becomes firmer when thoroughly chilled because of its dairy content. Removing it from the refrigerator shortly before serving allows the texture to soften slightly and makes dipping easier.

If necessary, stir the mixture briefly before transferring it to the serving bowl. Avoid adding extra liquid because this can make the dip unnecessarily loose.

Storage

Keep the whipped blue cheese mixture refrigerated in a clean airtight container. Use clean utensils when serving and return any unused portion to the refrigerator promptly.

Add fresh honey when serving rather than storing the dip already covered with honey. This gives the finished dish a cleaner appearance and preserves the contrast between the two flavours.

Whipped Blue Cheese Honey Dip is a compact Basic recipe that turns a handful of ingredients into a rich, creamy accompaniment. The combination of strong blue cheese, mild ricotta, tangy crรจme fraรฎche and sweet honey makes it particularly useful for appetisers, snacks and party platters.

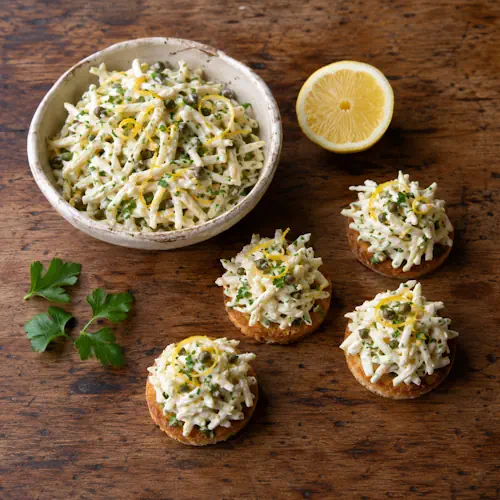
Celeriac Remoulade Canapรฉ Topping


Creamy celeriac remoulade with capers, parsley and lemon served on crisp canapรฉ bases.

Celeriac Remoulade Canapรฉ Topping

A fresh and creamy canapรฉ topping made with finely shredded celeriac, capers, Dijon mustard, mayonnaise, lemon and parsley. Quick to prepare and ideal for making ahead before assembling canapรฉs.
Couverts4
Total time 20 minutes
estimated costs pp $0.85
Deel op Facebook Print Recipe

Equipment

  • Knife
  • Mandoline, optional

Ingredients

Instructions

  • Cut the celeriac into fine matchsticks using a mandoline or sharp knife.
  • Place the celeriac in a bowl with the capers, lemon zest and juice, Dijon mustard, mayonnaise and parsley.
  • Season with freshly ground black pepper and mix thoroughly.
  • Chill until needed.
  • Store in an airtight container in the refrigerator for up to 3 days.
  • Spoon onto your chosen canapรฉ bases shortly before serving.

Notes & Wine Advice

Serving Suggestions

Spoon the celeriac remoulade onto your chosen canapรฉ bases shortly before serving. It works particularly well on crisp toast, potato or polenta bases and can be served as an Appetizer, Amuse or small party bite.

Recipe Notes

Cut the celeriac into very fine matchsticks so it combines evenly with the dressing and is easy to eat as a canapรฉ topping. A mandoline is useful for producing thin, even strips, although a sharp knife works perfectly well.

Variations

For a sharper remoulade, increase the Dijon mustard or add a little extra lemon juice. Fresh chives can be scattered over the finished canapรฉs, while additional parsley gives the mixture a fresher herbal flavour.

Storage Advice

Transfer the prepared remoulade to an airtight container and refrigerate for up to 3 days. Stir before serving. Keep the topping separate from crisp canapรฉ bases until shortly before serving so they do not become soft.

Wine Advice

A crisp Sauvignon Blanc complements the lemon, mustard and capers particularly well. A dry Pinot Grigio is another fresh choice for these light canapรฉs.

Nutrition values

Serving: 85 gr | Calories: 145 kcal | koolhydraten: 7 g | Eiwitten: 2 g | Vet: 12 g | Verzadigd vet: 2 g | Natrium: 390 mg | Suiker: 3 g
————————————————————————————————–

About Celeriac Remoulade Canapรฉ Topping

Celeriac Remoulade Canapรฉ Topping is a fresh, creamy preparation based on finely shredded celeriac mixed with capers, Dijon mustard, mayonnaise, lemon and parsley. Remoulade is closely associated with French cooking, where celeriac remoulade is commonly served as a cold salad. Turning it into a canapรฉ topping makes the familiar combination suitable for parties, celebrations and appetiser platters.

Preparing the Celeriac

Celeriac has a firm, crisp texture when raw. Cutting it into very fine matchsticks is therefore important, particularly when the remoulade is being used on small canapรฉ bases. A mandoline produces consistently thin strips, although a sharp knife can also be used.

Once cut, combine the celeriac promptly with the lemon juice. The acidity provides freshness and also helps prevent the exposed celeriac from discolouring too quickly.

Making the Remoulade Dressing

Mayonnaise forms the creamy base of the dressing, while Dijon mustard gives it characteristic sharpness. Lemon zest and juice provide acidity and fragrance, and roughly chopped capers add a salty, tangy flavour.

Fresh parsley lightens the dressing and adds colour. Black pepper can be added according to taste. Because capers, mustard and mayonnaise already contribute seasoning, taste the mixture before adding any additional salt.

Using It as a Canapรฉ Topping

The finished remoulade works particularly well as an Appetizer or Amuse. Spoon small amounts onto crisp canapรฉ bases rather than overloading them, as the topping should be easy to eat in one or two bites.

Toast, potato and polenta bases all provide a useful contrast to the creamy dressing and crisp celeriac. Assemble the canapรฉs shortly before serving so the bases remain crisp.

Preparing Ahead

One advantage of celeriac remoulade is that the topping itself can be prepared ahead. Once mixed, transfer it to an airtight container and keep it refrigerated until needed.

The recipe states that the prepared mixture can be refrigerated for up to 3 days. Stir it thoroughly before serving because a little moisture may collect while it stands.

Serving for Parties

This topping is particularly convenient for a Party or Birthday because the preparation can be completed before guests arrive. Only the final assembly needs to be done close to serving time.

For a canapรฉ platter, combine the remoulade-topped bases with other small appetisers that offer contrasting colours and textures. A small scattering of chopped chives or parsley makes a simple finishing garnish.

Texture and Flavour

The appeal of celeriac remoulade comes from the contrast between crisp raw celeriac and creamy mayonnaise. Dijon mustard, capers and lemon prevent the dressing from becoming overly rich and give the mixture a fresh, savoury character.

Because the ingredients are relatively simple, their balance matters. The mustard should be noticeable without dominating, while the lemon should provide freshness rather than excessive acidity.

Storage and Food Safety

Keep the prepared remoulade refrigerated because it contains mayonnaise and freshly cut vegetables. Use clean utensils when removing portions from the container and return unused topping to the refrigerator promptly.

For current information about preparing and storing food safely, consult the U.S. Food and Drug Administration food-safety information.

Celeriac Remoulade Canapรฉ Topping is a useful Basic recipe for entertaining. Its combination of crisp celeriac, creamy dressing, sharp mustard, capers and lemon creates a fresh topping that can be prepared ahead and quickly added to canapรฉ bases just before serving.

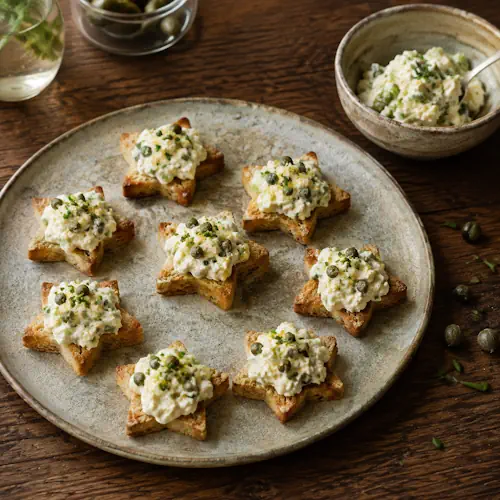
Celery Remoulade Canapรฉ Topping


Star-shaped toasts topped with cream cheese, capers, celery, parsley and chives.

Celery Remoulade Canapรฉ Topping

A fresh and creamy canapรฉ topping made with finely sliced celery, capers, mustard, mayonnaise and lemon juice. Fresh parsley and black pepper finish this simple make-ahead topping, which can be spooned onto your favourite canapรฉ bases just before serving.
Couverts4
estimated costs pp $1.15
Deel op Facebook Print Recipe

Equipment

  • Bowl, large
  • Knife
  • Sharp knife

Ingredients

Instructions

  • Cut the celeriac into fine matchsticks using a mandoline or a sharp knife.
  • Combine the celeriac in a bowl with the capers, lemon zest and juice, Dijon mustard, mayonnaise and parsley.
  • Chill until needed.
  • Refrigerate in an airtight container for up to 3 days.
  • Spoon the topping onto your chosen canapรฉ base and scatter with chives before serving.

Notes & Wine Advice

Serving Suggestions

Spoon the celeriac remoulade onto crisp canapรฉ bases shortly before serving and finish with finely chopped chives. It works particularly well as an Amuse or Appetizer and can be combined with toast, crisp potato or polenta bases.

Recipe Notes

Cut the celeriac into very fine matchsticks so it combines evenly with the creamy dressing. A mandoline makes this quick, but a sharp knife works just as well. Add the lemon juice immediately after cutting to help maintain the fresh colour.

Variations

Adjust the amount of Dijon mustard or lemon juice according to taste. Extra chopped herbs can be added for a fresher flavour. For a more substantial Salad, serve a larger portion rather than using the mixture as a canapรฉ topping.

Storage Advice

Transfer the prepared remoulade to an airtight container and refrigerate for up to 3 days. Stir before serving and add the topping to the canapรฉ bases only shortly before serving so they remain crisp.

Wine Advice

A crisp Sauvignon Blanc pairs well with the lemon, mustard, capers and fresh herbs. A dry Pinot Grigio is another fresh choice for these light canapรฉs.

Nutrition values

Serving: 85 gr | Calories: 145 kcal | koolhydraten: 7 g | Eiwitten: 2 g | Vet: 12 g | Verzadigd vet: 2 g | Natrium: 390 mg | Suiker: 3 g
————————————————————————————————–

About Celery Remoulade Canapรฉ Topping

Celery Remoulade Canapรฉ Topping is a fresh, creamy mixture of finely cut celeriac, capers, Dijon mustard, mayonnaise, lemon and parsley. Remoulade has strong associations with French cooking, and this simple version makes an excellent topping for small canapรฉ bases. Its combination of creamy mayonnaise, sharp mustard, salty capers and fresh citrus gives plenty of flavour in a small portion.

Preparing the Celeriac

Celeriac has a firm texture, so cutting it finely is important. Thin matchsticks are easier to eat on a small canapรฉ and allow the dressing to coat the vegetable evenly. A mandoline is useful for producing consistently thin pieces, although a sharp knife can also be used.

Once cut, combine the celeriac promptly with the lemon juice and remaining ingredients. The acidity adds freshness and helps prevent the cut vegetable from discolouring too quickly.

Making the Remoulade Dressing

Dijon mustard and mayonnaise create the creamy foundation of the dressing. Lemon zest and juice add acidity and fragrance, while roughly chopped capers contribute a salty, tangy flavour. Fresh parsley provides a final herbal note.

Because capers, mustard and mayonnaise can all contain salt, taste the finished mixture before adding any additional seasoning. Freshly ground black pepper may be all that is required.

Using It as a Canapรฉ Topping

This mixture is particularly useful for an Amuse or Appetizer because it can be prepared before the canapรฉ bases are assembled. Spoon small portions onto crisp bases and finish with chopped chives shortly before serving.

The creamy texture contrasts particularly well with crisp toast, potato or polenta bases. Avoid assembling the canapรฉs too early because moisture from the remoulade can soften crisp bases.

Serving for Celebrations

Small canapรฉs are useful for a Party, Birthday or festive gathering because they can be served without cutlery. Arrange the finished canapรฉs on a platter and garnish them just before they go to the table.

The pale remoulade can also be paired with colourful toppings or garnishes when it forms part of a larger selection of appetisers.

Preparing Ahead

The prepared topping can be kept refrigerated in an airtight container for up to 3 days. This makes it convenient when several different Snack or canapรฉ recipes need to be prepared for the same occasion.

Stir the mixture before using it because a little liquid can collect as it stands. If necessary, drain away excess moisture before spooning it onto crisp bases.

Food Safety

Keep the remoulade refrigerated because it contains mayonnaise and freshly prepared vegetables. Return unused topping to the refrigerator promptly and use clean utensils when serving. For current information about safe food preparation and refrigerated storage, consult the U.S. Food and Drug Administration food-safety information.

Celery Remoulade Canapรฉ Topping is a versatile Basic recipe that combines crisp celeriac with a creamy, tangy dressing. Prepared ahead and spooned onto crisp bases just before serving, it provides an easy way to add a fresh vegetable option to a platter of canapรฉs.